
Compiling from source on UNIX
If you downloaded the source distribution, you need at least the following to build the executable:
To take full advantage of doxygen’s features the following additional tools should be installed.
Compilation is now done by performing the following steps:
Run cmake with the makefile generator
cmake tries to determine the platform you use, and will look for the requires tools. It will report if something is missing.
If you have Qt-4.3 or higher installed and want to build the GUI front-end, you should enable it as follows:
For an overview of other configuration options use
Compile the program by running make:
The program should compile without problems and the binaries ( doxygen and optionally doxywizard ) should be available in the bin directory within the build directory.
Optional: Generate the user manual.
To let doxygen generate the HTML and PDF documentation.
The HTML directory within the build directory will now contain the html documentation (just point a HTML browser to the file index.html in the html directory).
Optional: static linking
If you want to build a statically linked version of doxygen that embeds libclang you need to first build LLVM and clang from sources using the following options:
and then build doxygen with these options:
Installing the binaries on UNIX
After the compilation of the source code do a make install to install doxygen. If you downloaded the binary distribution for Linux, type:
Note You need the GNU install tool for this to work (it is part of the coreutils package). Other install tools may put the binaries in the wrong directory!
If you have a RPM or DEP package, then please follow the standard installation procedure that is required for these packages.
Compiling from source on Windows
From version 1.8.10 onwards, build files need to be generated by cmake. cmake can be downloaded from https://cmake.org/download/
At the moment only the express version of Visual Studio 2015 and 2017 are tested, but other version might also work.
Alternatively, you can compile doxygen the UNIX way using Cygwin or MinGW.
The next step is to install modern versions of bison and flex (see https://sourceforge.net/projects/winflexbison/. After installation and adding them to your path rename win_flex.exe to flex.exe and win_bison.exe to bison.exe ) Furthermore you have to install python (version 2.7 or higher, see https://www.python.org). These packages are needed during the compilation process.
Download doxygen’s source tarball and put it somewhere (e.g. use c:\tools )
Now start a visual studio native command shell (for either x86 or x64) and type
to unpack the sources (you can obtain tar from e.g. http://gnuwin32.sourceforge.net/packages.html). Alternatively you can use an unpack program, like 7-Zip (see https://www.7-zip.org/) or use the built-in unpack feature of modern Windows systems).
cd into the doxygen-x.y.z directory, create and cd to a build directory
This will create a project file then can be opened in Visual Studio.
If you prefer compiling from the command prompt you can use the following instead:
Note that compiling Doxywizard requires Qt 4.3 or newer (see https://www.qt.io/developers).
Also read the next section for additional tools you may need to install to run doxygen with certain features enabled.
Installing the binaries on Windows
Doxygen comes as a self-installing archive, so installation is extremely simple. Just follow the dialogs.
After installation it is recommended to also download and install GraphViz (version 2.38 or better is highly recommended). Doxygen can use the dot tool of the GraphViz package to render nicer diagrams, see the HAVE_DOT option in the configuration file.
If you want to produce compressed HTML files (see GENERATE_HTMLHELP) in the configuration file, then you need the Microsoft HTML help workshop. In the beginning of 2021 Microsoft took the original page, with a.o. the download links, offline the HTML help workshop was already many years in maintenance mode). You can download the HTML help workshop from the web archives at Installation executable.
If you want to produce Qt Compressed Help files (see QHG_LOCATION) in the configuration file, then you need qhelpgenerator which is part of Qt. You can download Qt from Qt Software Downloads.
In order to generate PDF output or use scientific formulas you will also need to install LaTeX and Ghostscript.
For  a number of distributions exists. Popular ones that should work with doxygen are MikTex and proTeXt.
Ghostscript can be downloaded from Sourceforge.
After installing and Ghostscript you’ll need to make sure the tools latex.exe, pdflatex.exe, and gswin32c.exe (or gswin64c.exe) are present in the search path of a command box. Follow these instructions if you are unsure and run the commands from a command box to verify it works.
Go to the next section or return to the index.
Записки программиста
Генерируем документацию к проектам на C/C++ с Doxygen
Программисты, как правило, не очень любят писать тесты. Но куда сильнее они не любят писать документацию. Тесты хотя бы представляют собой программы, а документация — это что? Просто текст. Вот пусть кто-нибудь другой его и пишет, технические писатели например! Впрочем, если речь идет не о пользовательской документации, а об описании классов и методов, предназначенном для других программистов, тут откосить вряд ли удастся. К счастью, есть Doxygen, способный существенно помочь со столь неприятной для многих работой.
Fun fact! Несмотря на то, что в рамках этого поста мы будем говорить о Doxygen исключительно в контексте языков C и C++, он также поддерживает языки Java, Python, PHP, и другие.
Установка Doxygen осуществляется как-то так:
# если у вас Ubuntu:
sudo apt-get install doxygen
Далее переходим в каталог с нашим проектом и создаем шаблонный файл Doxyfile командой:
В Doxyfile содержится краткое описание проекта, его версия и подобные вещи. Следующие значения стоит сразу изменить.
Краткое описание проекта:
Куда писать сгенеренные доки:
Отключаем LaTeX, так как HTML обычно достаточно:
Где искать файлы, из которых генерировать документацию — список файлов и директорий через пробел:
Включаем рекурсивный обход директорий:
Всего в файле около 2500 строк с подробным описанием всех параметров. Однако помимо приведенных выше параметров вам вряд ли придется что-то менять.
Правила хорошего тона гласят, что для каждой процедуры или метода класса (независимо от того, публичные они или приватные) должно быть как минимум краткое описание того, что делает процедура или метод, описание каждого из аргументов, а также описание возвращаемого значения. Если метод делает еще что-то, например, как-то меняет состояние класса, это также обязательно нужно задокументировать.
Аналогично, краткое описание того, что они из себя представляют, должно быть у самих классов и структур. Не лишним будет рассказать, является ли класс копируемым или thread-safe. Краткое описание должно быть у каждого атрибута класса.
В действительности, Doxygen поддерживает куда больше команд. Например, он позволяет писать многостраничную ( @page ) документацию с разделами ( @section ) и подразделами ( @subsection ), указывать версии методов и классов ( @version ), и не только. Ознакомиться с полным списком команд можно здесь.
Fun fact! Doxygen понимает Markdown в комментариях. Краткую шпаргалку по Markdown вы найдете в заметке про создание статического блога на Pelican.
Для генерации и просмотра документации просто говорим:
Если вас интересуют конкретные примеры, рекомендую посмотреть документацию по libevent, wxWidgets или Assimp. Любой проект куда проще поддерживать, если у него есть такая же классная документация!
А используете ли вы Doxygen, и что в целом о нем думаете?
Дополнение: Вас также может заинтересовать пост Построение UML-диаграмм с помощью PlantUML. В Doxygen имеется поддержка PlantUML.
How to generate documentation from source code in Linux
Last updated on September 9, 2020 by Dan Nanni
If you are an open-source developer and want to release your project to the public, you may consider publishing source-code documentation for the project. In cases where you are trying to read source code written by others, it will also be helpful if you can get a bird-eye view of the otherwise cryptic source code.
In Linux, doxygen is the de facto standard tool for automatically generating cross-reference documentation from annotated source code. It supports major programming languages including C/C++, Objective-C, C#, PHP, Java and Python. There are more than 350 open-source projects (e.g., Drupal, Gaim, GNU C++ library, KDE) that rely on doxygen for automatic documentation of their source code.
Install Doxygen on Linux
For Ubuntu, Debian or Linux Mint:
To install doxygen on Ubuntu, Linux Mint or Debian:
For CentOS, Fedora or RHEL:
To install doxygen on CentOS, Fedora or RHEL:
Generate Documentation from Source code with doxygen
To generate documentation of source code, proceed as follows.
First, generate a project-specific doxygen configuration file:
The above command will generate a template configuration file for a particular project, which you can further customize as described below.
Among others, you can edit the following options in the configuration file.
Now go ahead and run doxygen with the configuration file.
To browse the HTML-formatted documentation, you can use any web browser to open the HTML index file.
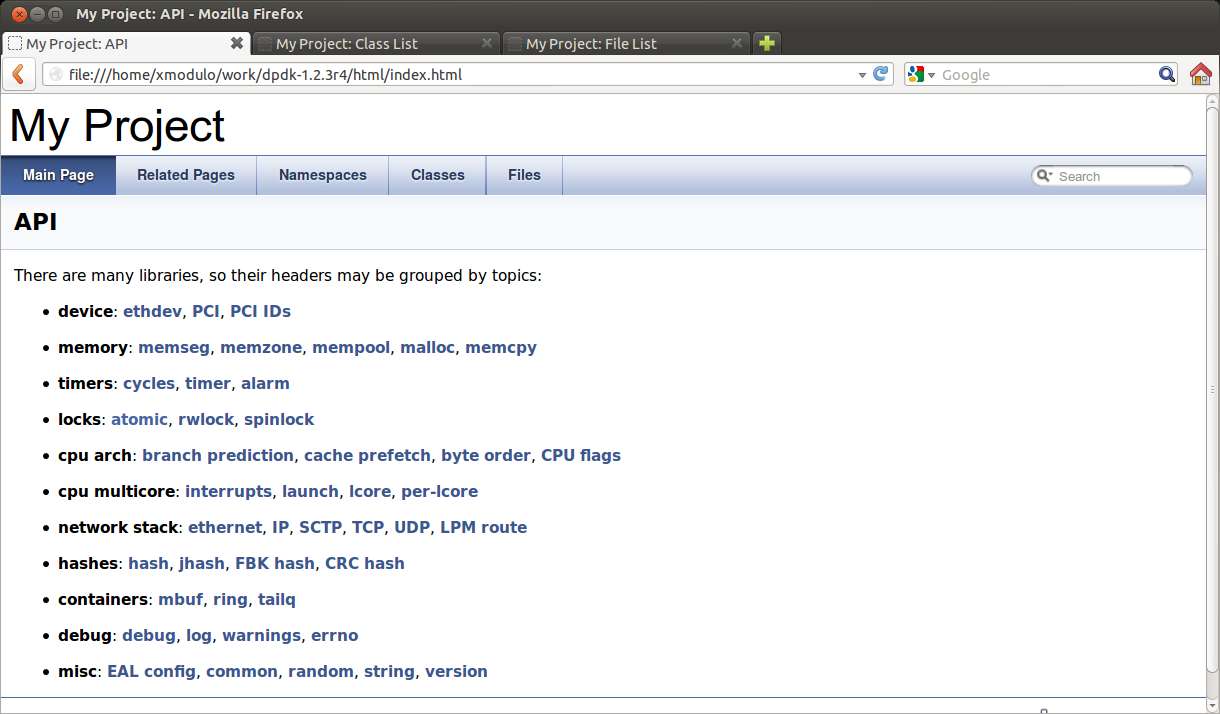
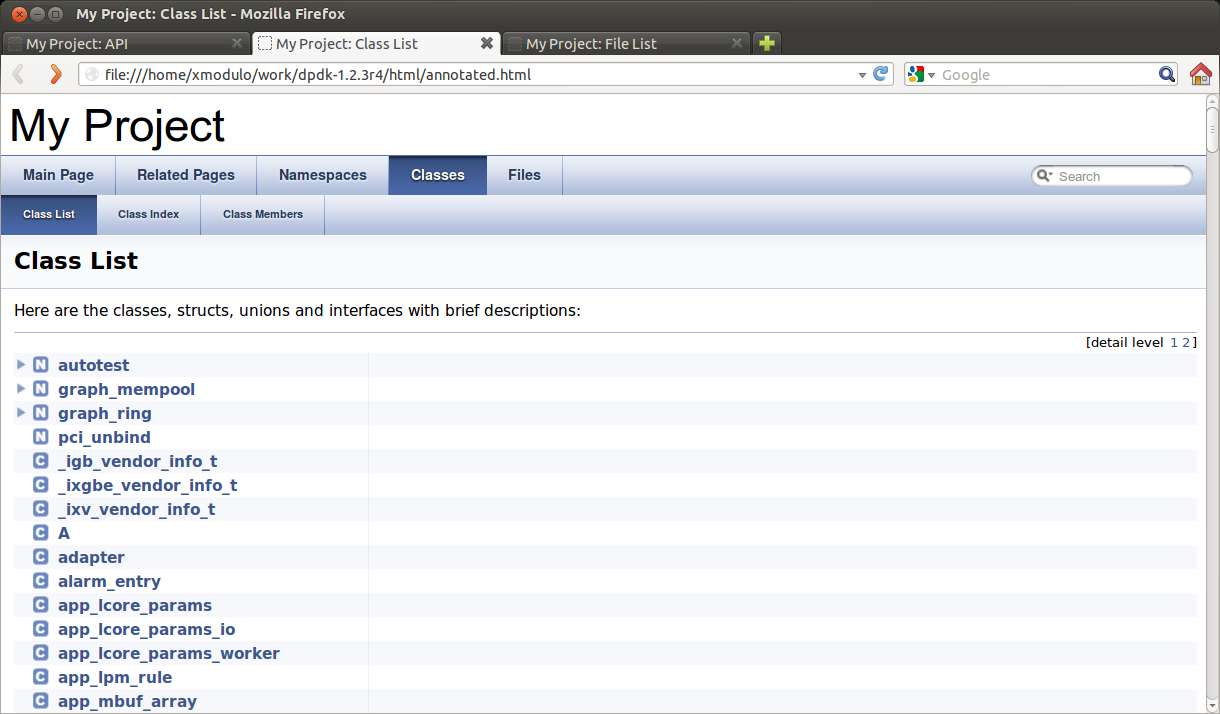
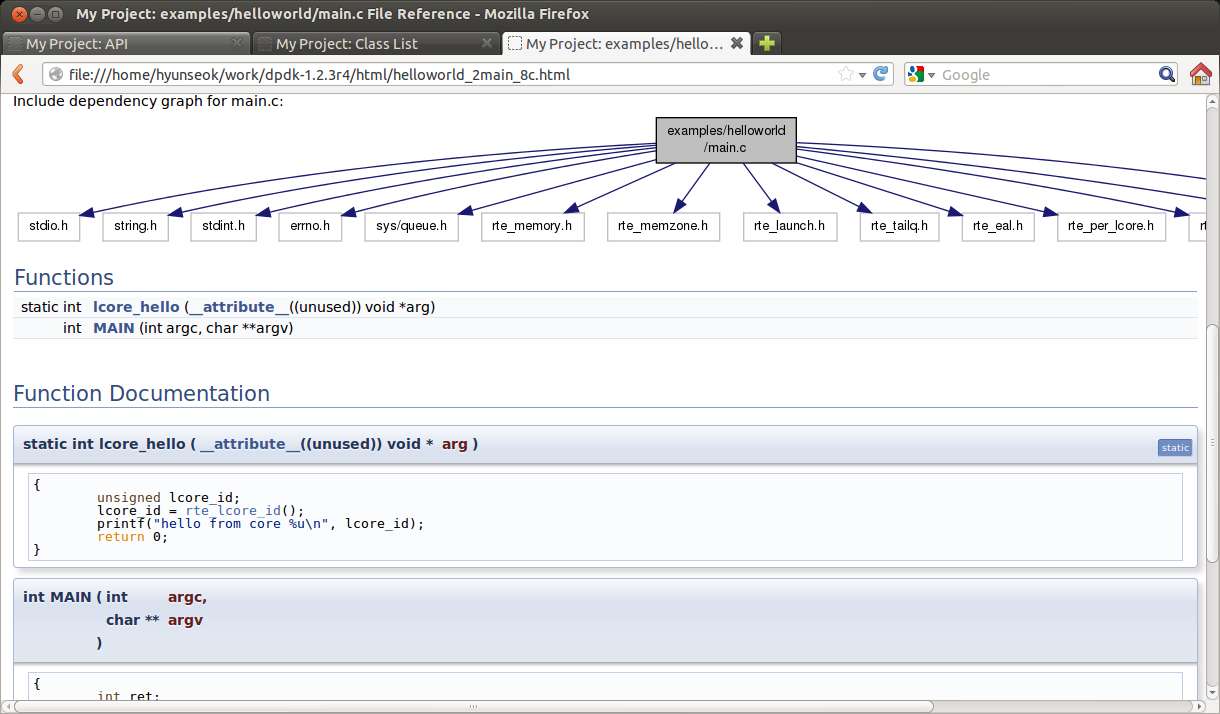
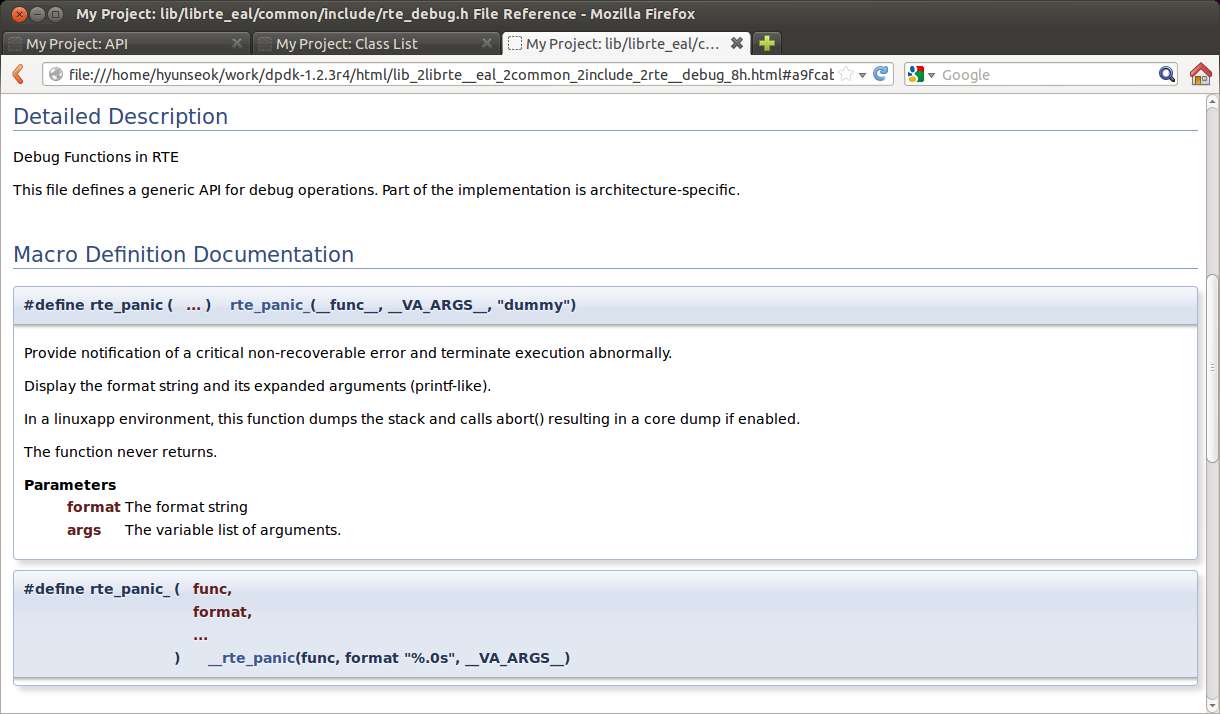
doxygen Documentation Screenshots
This shows a list of header files that are automatically categorized by topics.
This shows a list of classes, structs, unions and interfaces with descriptions.
This shows a source code browser listing all source files recursively in sub-directories.

If you click on a particular source file, you will see a page which shows dependency graph for the file, as well as documentation for all defined functions.
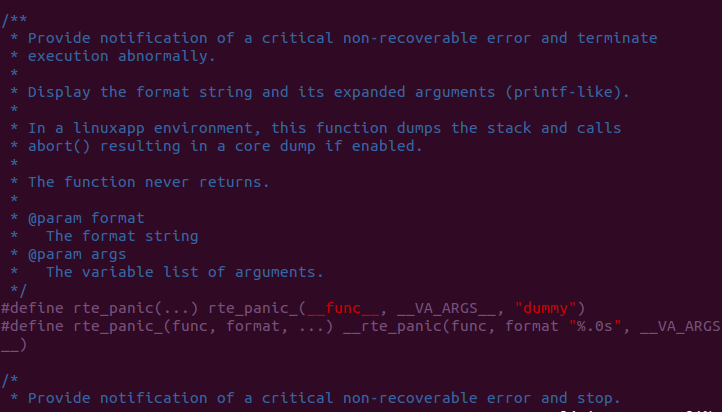
This shows a detailed view of function/macro definitions. Below the figure is shown the actual source code snippet that corresponds to this documented portion.
Support Xmodulo
This website is made possible by minimal ads and your gracious donation via PayPal (Credit Card) or Bitcoin ( 1M161JGAkz3oaHNvTiPFjNYkeABox8rb4g ).
Step 0: Check if doxygen supports your programming language
First, assure that your programming language has a reasonable chance of being recognized by doxygen. These languages are supported by default: C, C++, Lex, C#, Objective-C, IDL, Java, VHDL, PHP, Python, Fortran and D. It is possible to configure certain file type extensions to use certain parsers: see the Configuration/ExtensionMappings for details. Also, completely different languages can be supported by using preprocessor programs: see the Helpers page for details.
Step 1: Creating a configuration file
Doxygen uses a configuration file to determine all of its settings. Each project should get its own configuration file. A project can consist of a single source file, but can also be an entire source tree that is recursively scanned.
The configuration file has a format that is similar to that of a (simple) Makefile. It consists of a number of assignments (tags) of the form:
You can probably leave the values of most tags in a generated template configuration file to their default value. See section Configuration for more details about the configuration file.
If you do not wish to edit the configuration file with a text editor, you should have a look at doxywizard, which is a GUI front-end that can create, read and write doxygen configuration files, and allows setting configuration options by entering them via dialogs.
For a small project consisting of a few C and/or C++ source and header files, you can leave INPUT tag empty and doxygen will search for sources in the current directory.
Doxygen looks at the file’s extension to determine how to parse a file, using the following table:
| Extension | Language | Extension | Language | Extension | Language |
|---|---|---|---|---|---|
| .dox | C / C++ | .hpp | C / C++ | .py | Python |
| .doc | C / C++ | .h++ | C / C++ | .pyw | Python |
| .c | C / C++ | .mm | C / C++ | .f | Fortran |
| .cc | C / C++ | .txt | C / C++ | .for | Fortran |
| .cxx | C / C++ | .idl | IDL | .f90 | Fortran |
| .cpp | C / C++ | .ddl | IDL | .f95 | Fortran |
| .c++ | C / C++ | .odl | IDL | .f03 | Fortran |
| .ii | C / C++ | .java | Java | .f08 | Fortran |
| .ixx | C / C++ | .cs | C# | .f18 | Fortran |
| .ipp | C / C++ | .d | D | .vhd | VHDL |
| .i++ | C / C++ | .php | PHP | .vhdl | VHDL |
| .inl | C / C++ | .php4 | PHP | .ucf | VHDL |
| .h | C / C++ | .php5 | PHP | .qsf | VHDL |
| .H | C / C++ | .inc | PHP | .l | Lex |
| .hh | C / C++ | .phtml | PHP | .md | Markdown |
| .HH | C / C++ | .m | Objective-C | .markdown | Markdown |
| .hxx | C / C++ | .M | Objective-C | .ice | Slice |
Please note that the above list might contain more items than that by default set in the FILE_PATTERNS.
Any extension that is not parsed can be set by adding it to FILE_PATTERNS and when the appropriate EXTENSION_MAPPING is set.
Step 2: Running doxygen
To generate the documentation you can now enter:
HTML output
The generated HTML documentation can be viewed by pointing a HTML browser to the index.html file in the html directory. For the best results a browser that supports cascading style sheets (CSS) should be used (I’m using Mozilla Firefox, Google Chrome, Safari, and sometimes IE8, IE9, and Opera to test the generated output).
Some of the features the HTML section (such as GENERATE_TREEVIEW or the search engine) require a browser that supports Dynamic HTML and JavaScript enabled.
LaTeX output
The generated documentation must first be compiled by a compiler (I use a recent teTeX distribution for Linux and MacOSX and MikTex for Windows). To simplify the process of compiling the generated documentation, doxygen writes a Makefile into the latex directory (on the Windows platform also a make.bat batch file is generated).
The contents and targets in the Makefile depend on the setting of USE_PDFLATEX. If it is disabled (set to NO ), then typing make in the latex directory a dvi file called refman.dvi will be generated. This file can then be viewed using xdvi or converted into a PostScript file refman.ps by typing make ps (this requires dvips ).
To put 2 pages on one physical page use make ps_2on1 instead. The resulting PostScript file can be send to a PostScript printer. If you do not have a PostScript printer, you can try to use ghostscript to convert PostScript into something your printer understands.
Conversion to PDF is also possible if you have installed the ghostscript interpreter; just type make pdf (or make pdf_2on1 ).
RTF output
XML output
A file called combine.xslt XSLT script is also generated and can be used to combine all XML files into a single file.
Doxygen also generates two XML schema files index.xsd (for the index file) and compound.xsd (for the compound files). This schema file describes the possible elements, their attributes and how they are structured, i.e. it the describes the grammar of the XML files and can be used for validation or to steer XSLT scripts.
In the addon/doxmlparser directory you can find a parser library for reading the XML output produced by doxygen in an incremental way (see addon/doxmlparser/doxmparser/index.py and addon/doxmlparser/doxmlparser/compound.py for the interface of the library)
Man page output
The generated man pages can be viewed using the man program. You do need to make sure the man directory is in the man path (see the MANPATH environment variable). Note that there are some limitations to the capabilities of the man page format, so some information (like class diagrams, cross references and formulas) will be lost.
DocBook output
Doxygen can also generate output in the DocBook format. How to process the DocBook output is beyond the scope of this manual.
Step 3: Documenting the sources
Although documenting the sources is presented as step 3, in a new project this should of course be step 1. Here I assume you already have some code and you want doxygen to generate a nice document describing the API and maybe the internals and some related design documentation as well.
If the EXTRACT_ALL option is set to NO in the configuration file (the default), then doxygen will only generate documentation for documented entities. So how do you document these? For members, classes and namespaces there are basically two options:
Place a special documentation block in front of the declaration or definition of the member, class or namespace. For file, class and namespace members it is also allowed to place the documentation directly after the member.
See section Special comment blocks to learn more about special documentation blocks.
Place a special documentation block somewhere else (another file or another location) and put a structural command in the documentation block. A structural command links a documentation block to a certain entity that can be documented (e.g. a member, class, namespace or file).
See section Documentation at other places to learn more about structural commands.
The advantage of the first option is that you do not have to repeat the name of the entity.
Files can only be documented using the second option, since there is no way to put a documentation block before a file. Of course, file members (functions, variables, typedefs, defines) do not need an explicit structural command; just putting a special documentation block in front or behind them will work fine.
The text inside a special documentation block is parsed before it is written to the HTML and/or output files.
During parsing the following steps take place:
Go to the next section or return to the index.
Как установить doxygen на linux
Итак, процесс по шагам:
1. Качаем по ссылке [1], доступны версии для Linux i386, Mac OS X 10.6 (Snow Leopard), Mac OS X 10.4 (Tiger), Windows XP/Vista/7, а также исходники (Doxygen распространяется под лицензией GPL).
2. Запускаем doxygen-1.7.2-setup.exe. Отвечаем на несложные традиционные вопросы инсталлятора (можно тупо жать Next). После инсталляции появится папка c:\Program Files\doxygen\, где и находится вся система Doxygen, документация по ней, и утилиты.
3. Запускаем c:\Program Files\doxygen\bin\doxywizard.exe. Это программа, которая позволяет упростить создание и использование конфигурационного файла для создания документации (Doxygen GUI frontend).


5. Теперь осталось перейти на закладку Run и нажать на кнопку Run doxygen:

Если во время компиляции документации в текстах исходников встретятся ошибки, то они будут выведены в поле вывода «Output produced by doxygen». В сообщениях указаны номера строк, где найдены ошибки. Нумерация строк в сообщениях «tag without matching» может не совпадать со строками, где эти ошибки имеются на самом деле.
Запуск генерации документации можно также провести из командной строки вводом команды (config-file имя файла конфигурации doxygen):
В моем примере в папке VirtualSerial\Documentation\html\ появятся файлы в формате html. Начинать просмотр документации нужно с файла VirtualSerial\Documentation\html\index.html.

Если конфигурационного файла нет, то можно вручную сгенерить конфигурацию. Нужно выполнить, как минимум, следующие шаги (для примера VirtualSerial):
Закладка Run:
— нажимаем кнопку Run Doxugen. В результате получим файл единственный файл VirtualSerial\Documentation\rtf\refman.rtf.
[Проблема правильной обработки кодировки русского языка]
# раньше тут было указано INPUT_ENCODING = UTF-8
INPUT_ENCODING = windows-1251
Кроме того, если нужно правильно распознать русский текст, который есть в файле Doxygen.conf (например, это может быть текст имени проекта PROJECT_NAME и другие строки), то необходимо отредактировать переменную конфига DOXYFILE_ENCODING (указать кодировку windows-1251):
# раньше тут было указано DOXYFILE_ENCODING = UTF-8
DOXYFILE_ENCODING = windows-1251
Вот так можно исправить кодировку через интерфейс GUI:

После такого исправления html будет корректно генерироваться, и правильно отображаться всеми браузерами, русский текст будет без кракозябр.
[Экранирование специальных символов doxygen]
Для устранения предупреждений типа «имя_файла:номер_строки: warning: explicit link request to ‘define’ could not be resolved» нужно применять для экранирования спецсимволов обратный слеш ‘\’ (backslash). Например, так нужно экранировать символ # вместе с ключевым словом define:
тут текст \#define тут дальше текст
Это устранит предупреждения типа request to ‘. ‘ could not be resolved.