
Кали линукс для vmware
This guide is about virtualizing Kali Linux inside of VMware, allowing you to have a Kali VM. This is a great way to use Kali, as it is completely separate from the host, allows you to interact with other VMs (as well as the host, and other machines on the network), and allows you to revert to snapshots.
If you are trying to install VMware on Kali Linux (as a host), please see our guide.
The guide below is what we use to generate our pre-made Kali Linux VMware images. You may alter this to your needs. We always generate the images using the latest version of VMware Workstation, as Player and Fusion don’t have the same level of functionally and controls over settings.
You will need to enable virtualization in your BIOS/UEFI for (e.g. Intel VT-x/AMD-V)
Wizard
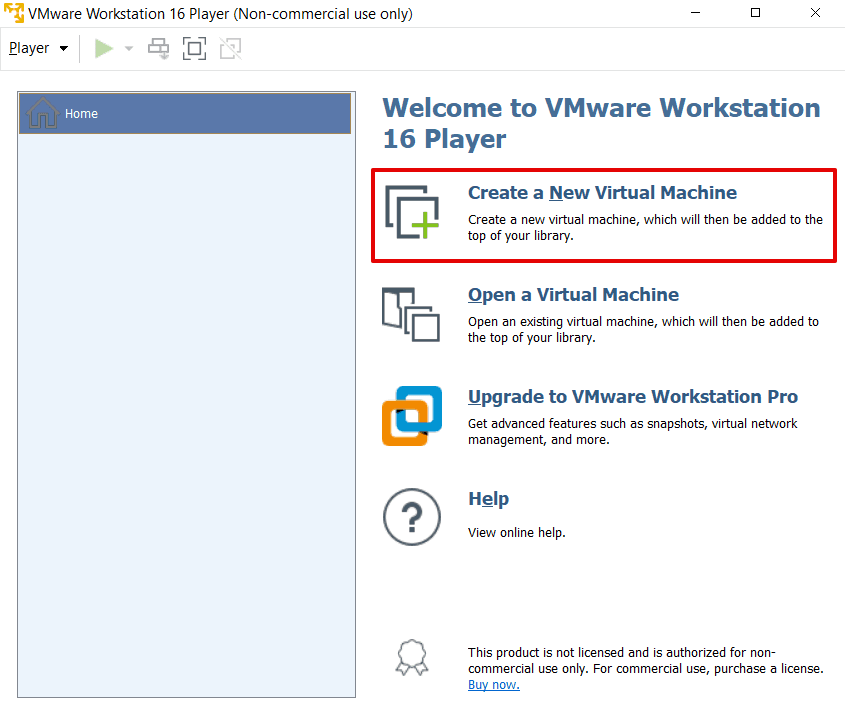
Upon starting up VMware Workstation, select “Create a New Virtual Machine”.

When you have the option, select “Custom (advanced)” for the Virtual Machine Configuration, as this will allow us to have more control over the creation of the VM.
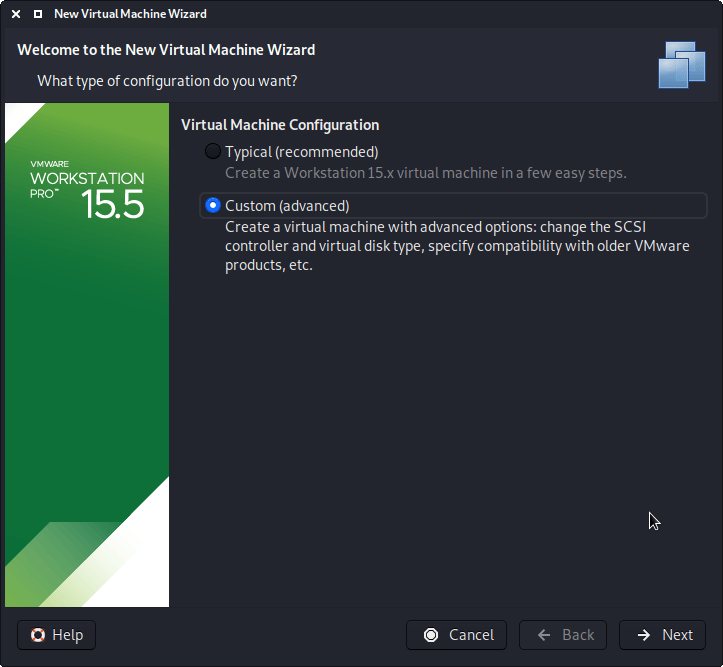
The next screen is “Virtual Machine Hardware Compatibility”, which we use “Workstation 8.x”.

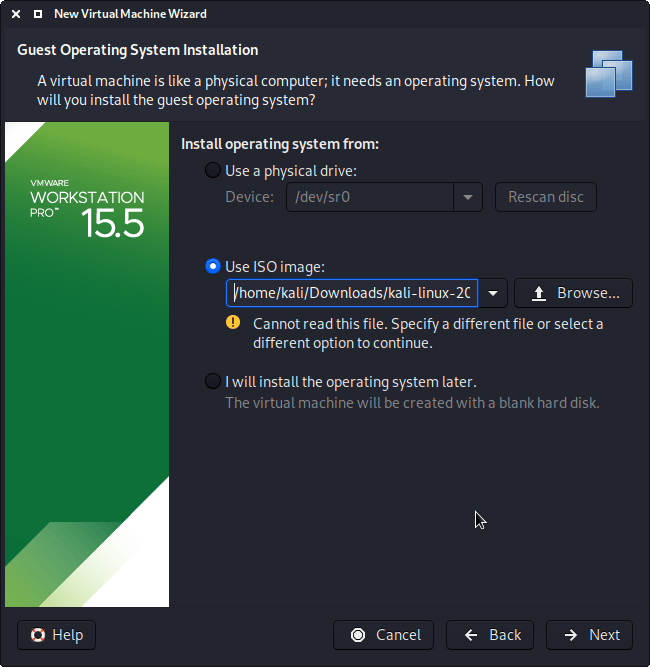
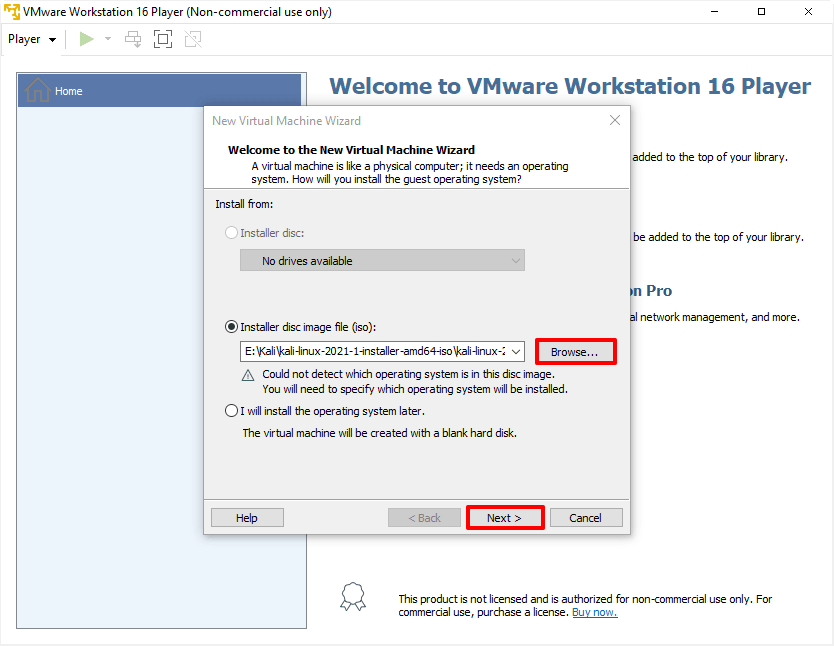
On this screen, we select the Kali Linux image to use to install from. We select “Browse”, and navigate to the location of the ISO that we downloaded. For more information on what image to download, we have written up a guide.
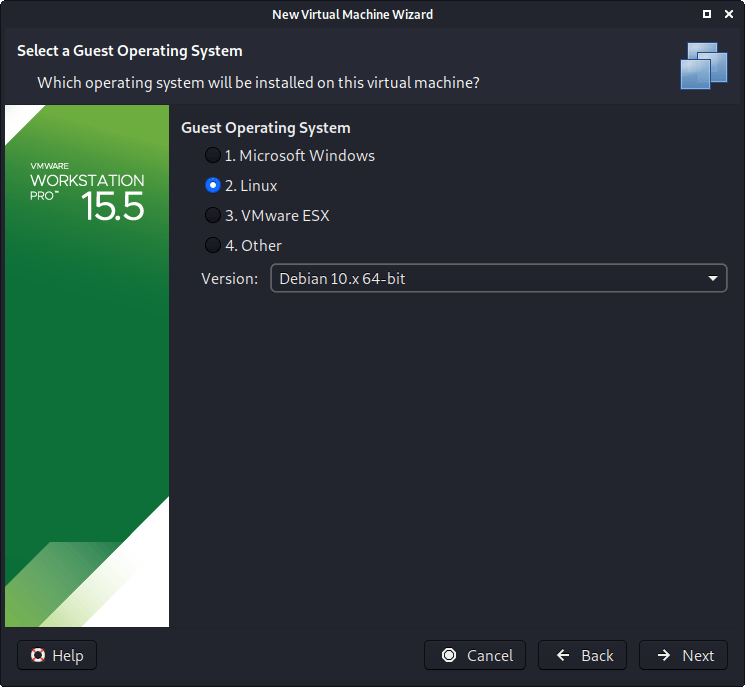
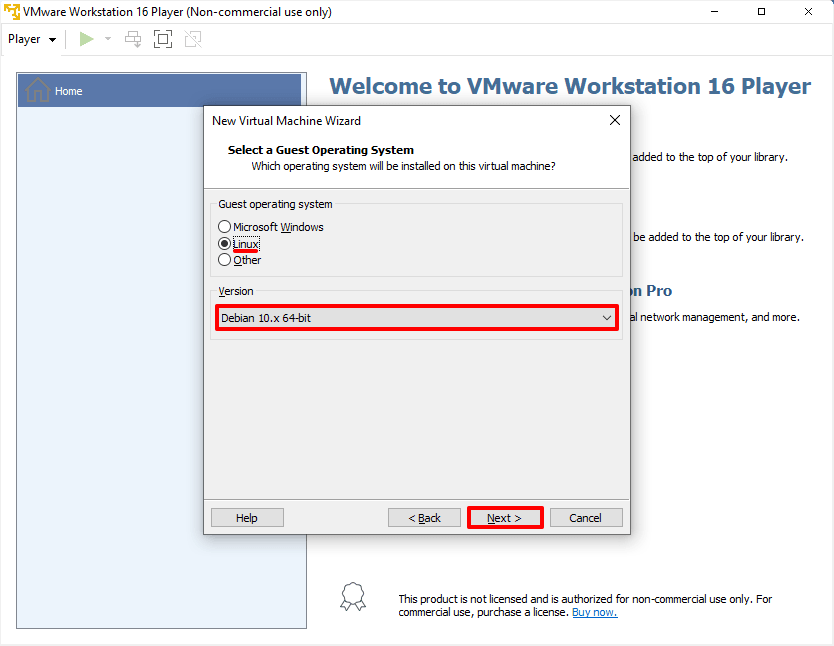
When you see the “Guest Operating System” screen, select “Linux”, and then the latest version of Debian for the version (as Kali is based on Debian). In this example, its Debian 10. We are going to be use the x64 image to install Kali, so we have selected 64-bit.
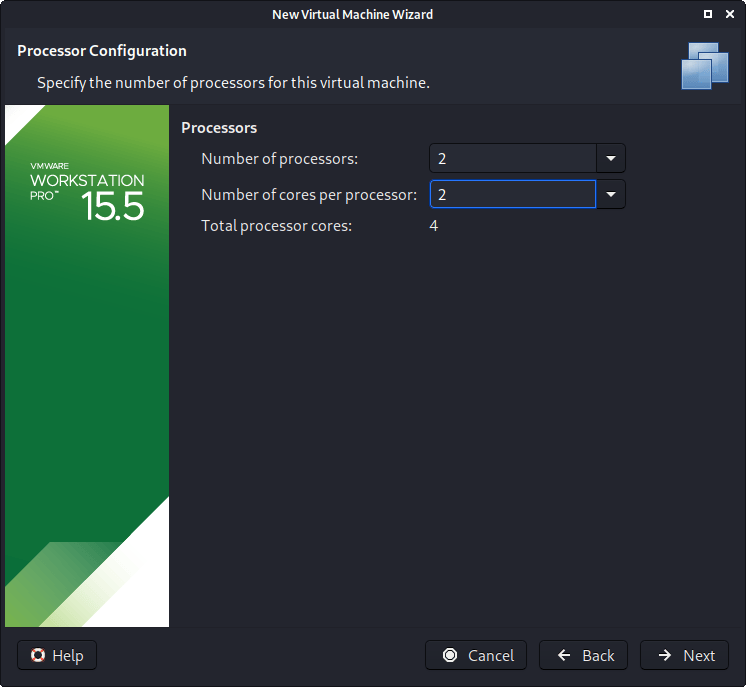
The next screen is “Processors”. Here we can start to define how many resources we give the VM. Kali will be able to perform more tasks simultaneously and quicker if it is allocated more resources. We select “2 processors” and “2 cores per processors”, giving a total of 4 cores. You may wish to use more or less depending on your system requirements.
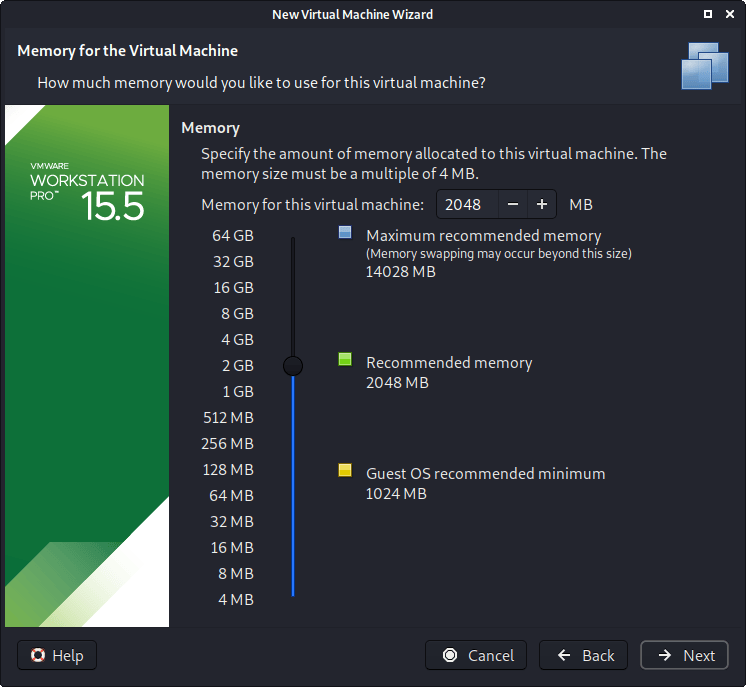
“Memory” is the next section, where we can define how much RAM to use. Again, the higher amount of RAM, the more applications can be open and at increased performance. Various tools inside of Kali can be demanding of resources. When we make the general VMs, we select 2GB (2048 MB) for RAM, but we often increase this for our personal machines as we have high-performing devices with spare RAM which Kali can utilize.
We are then presented with “Network Connection”. We default to using a NAT connection. However, this can easy be altered (even when the VM is powered on). This allows for Kali VM to talk to the Internet, as well as the rest of the LAN connection, without it taking up an additional IP address. The downside to this is it will not be able to receive reverse shells (without port forwarding inside of VMware).

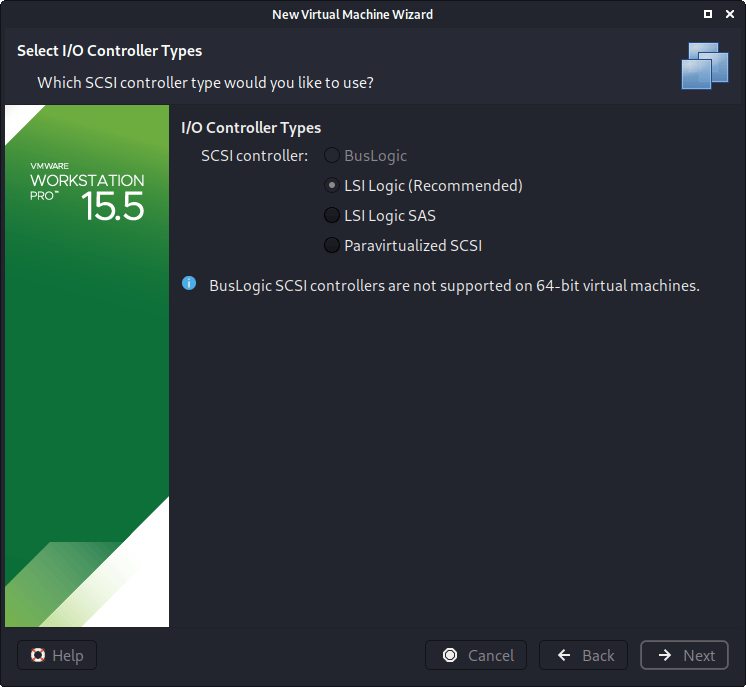
Next is “I/O Controller Types”. We accept the default value of “LSI Logic”.
Next is “Virtual Disk Type”. We accept the default value of “SCSI”

The following screen is “Disk”, which allows us to “create a new virtual disk”

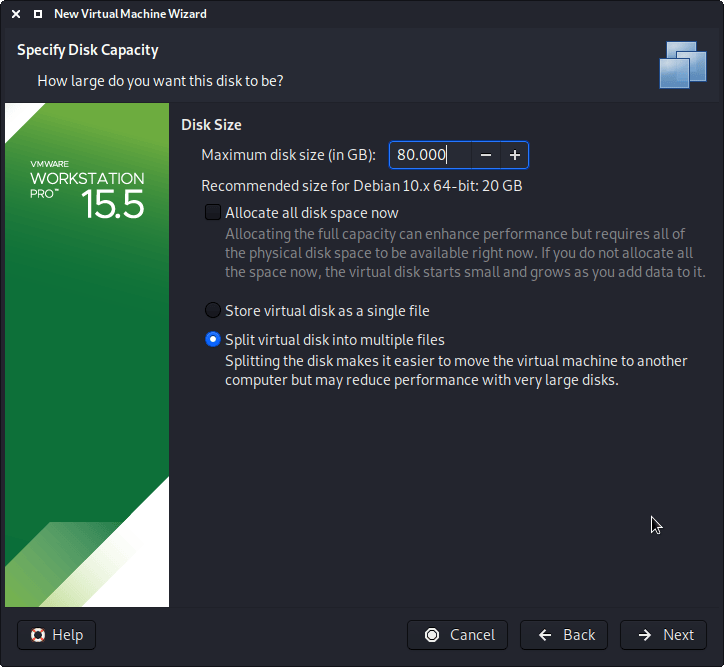
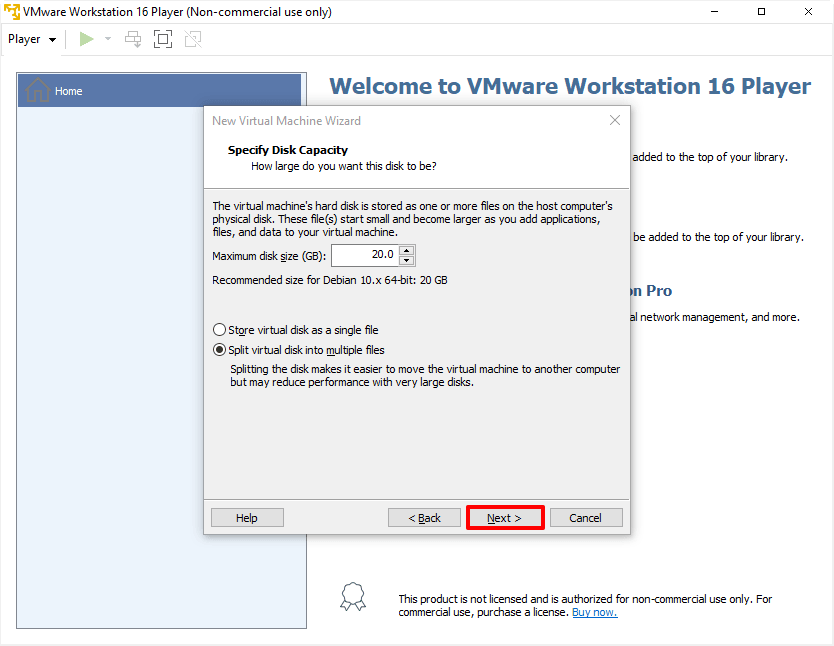
This screen below, “Disk Size”, allows us to define how large the virtual hard disk will be. We use “80 GB” for our VMs.
We also don’t have it in a single file, but instead “Split virtual disk into multiple files”. The VM hard disk will grow over time, to the maximum size, as we do not enable the “Allocate all disk space”.
It is possible to increase/decrease the hard disk after the VM has been created, however, if you have installed Kali, you’ll need to then also grow or shrink the partition for the space to reflect that.
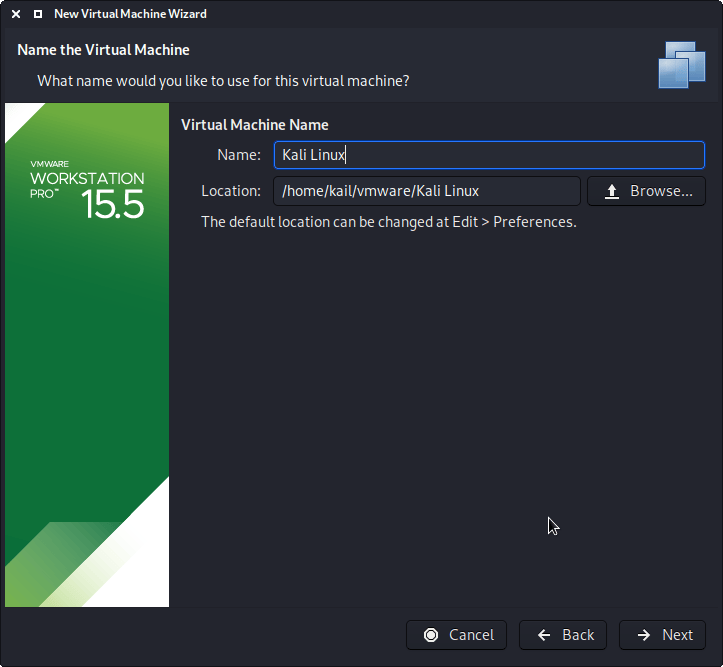
When it comes to the “Disk File” screen, we accept the default value, which has been defined from our VM name earlier in the setup process.

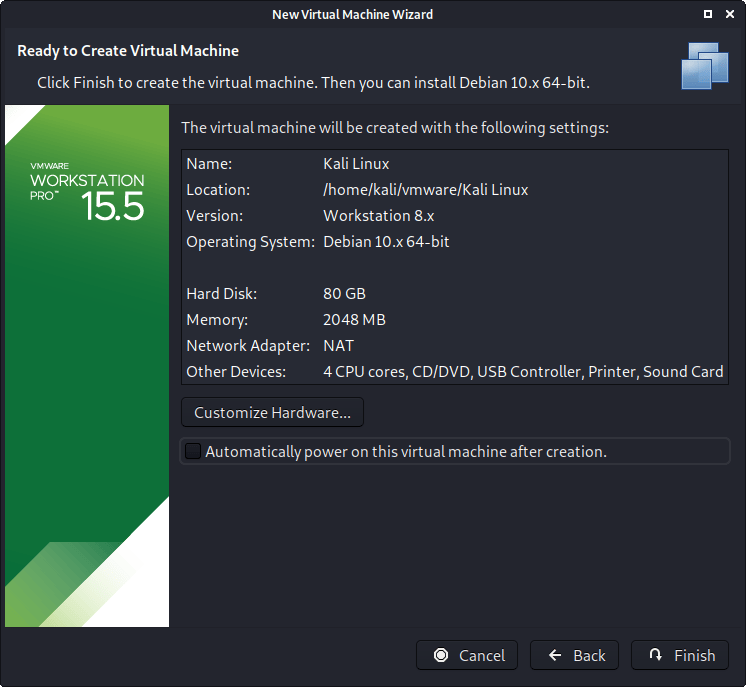
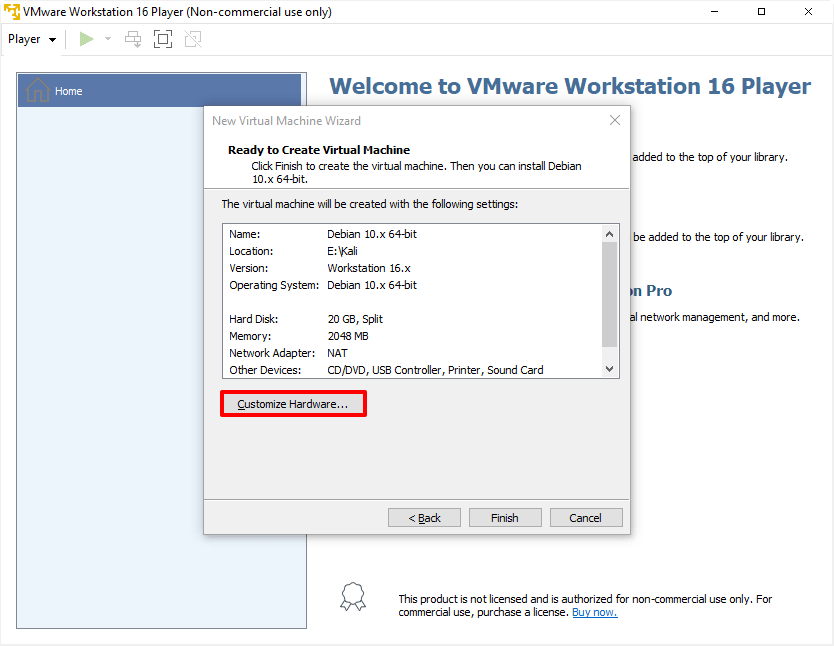
We are then presented the final screen for the VM setup wizard, which gives us an overview of the settings we picked.
We are happy with whats shown to us, so we then press “Finish”. If you try and “Customize Hardware” at this stage, before the VM is fully created, not every setting is visible.
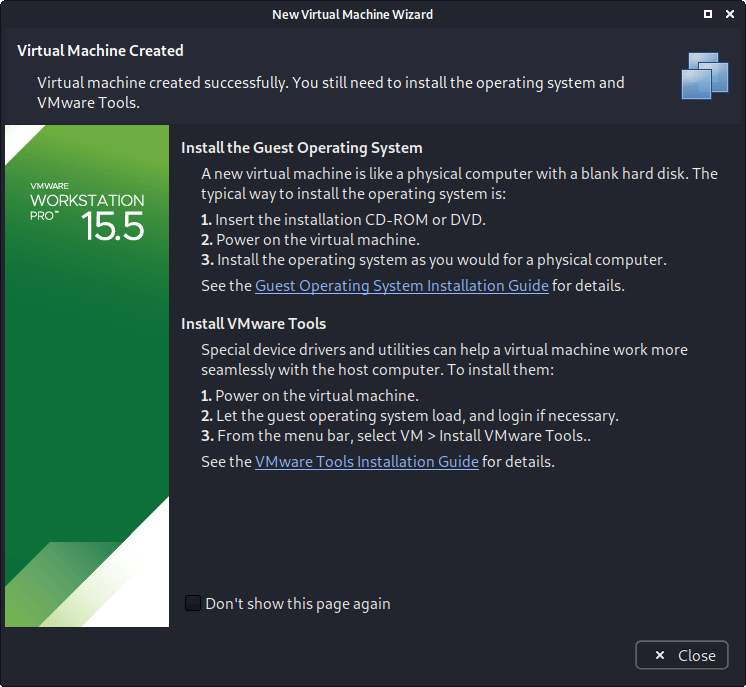
If this is the first time using the wizard, you may have the following prompt explaining how installing “VMware tools” will give you a better experience when using the VM.
After reading and understanding the page, you may wish to tick the “Don’t show this page again”, before pressing close.
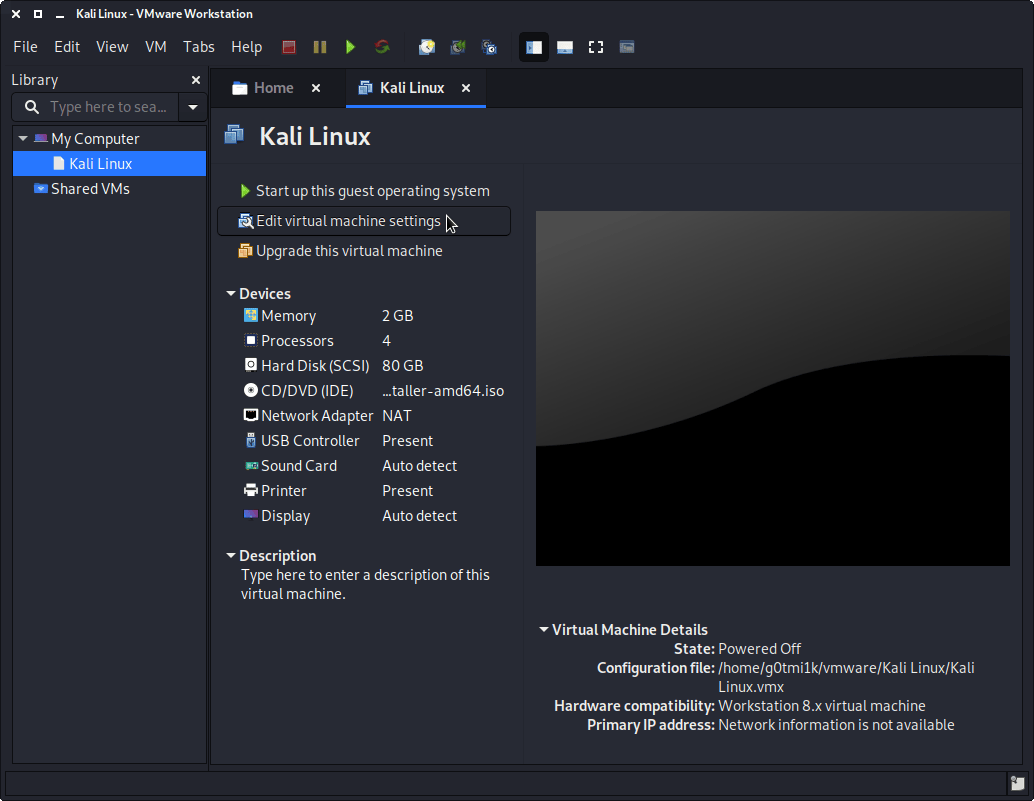
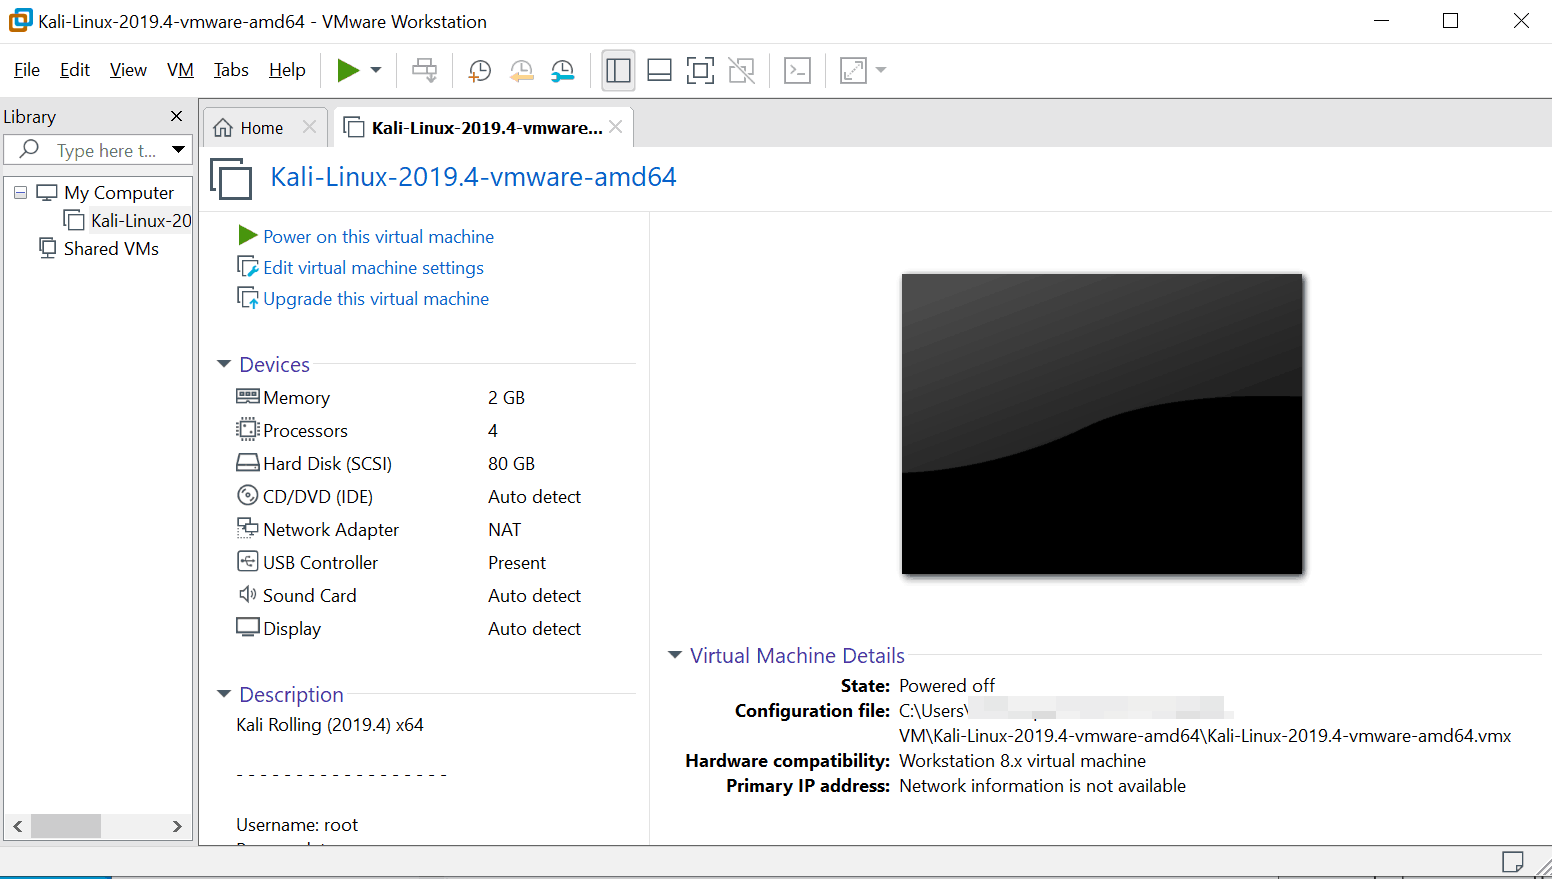
Edit Settings
Before we start up the VM, we now edit its settings, by pressing “Edit virtual machine settings”.
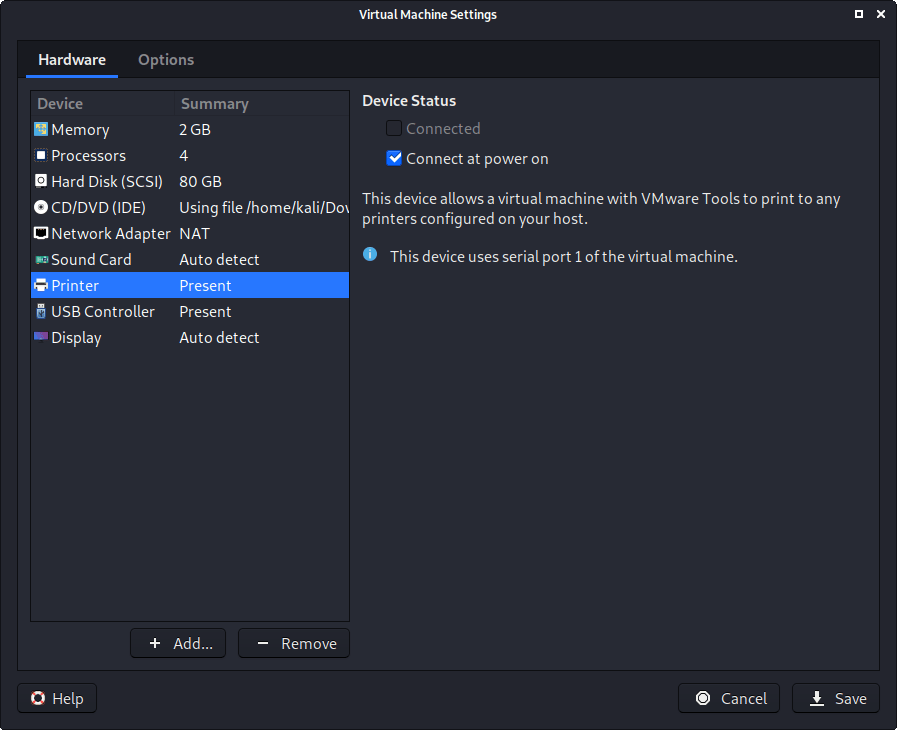
We do not have a use for a printer, so we remove it. Navigate to the “Printer” section, and then press “Remove”.
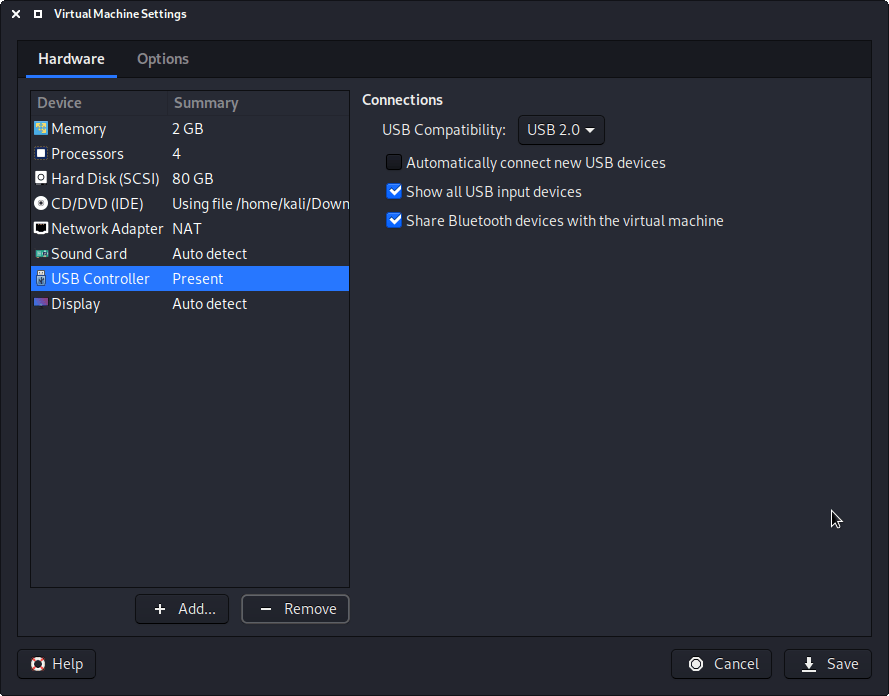
You may wish to edit the “USB” settings to alter how USB devices behave. Here we have disabled “Automatically connect new USB devices” (may not have the option depending on your VMware version) and enabled “Show all USB input devices”.
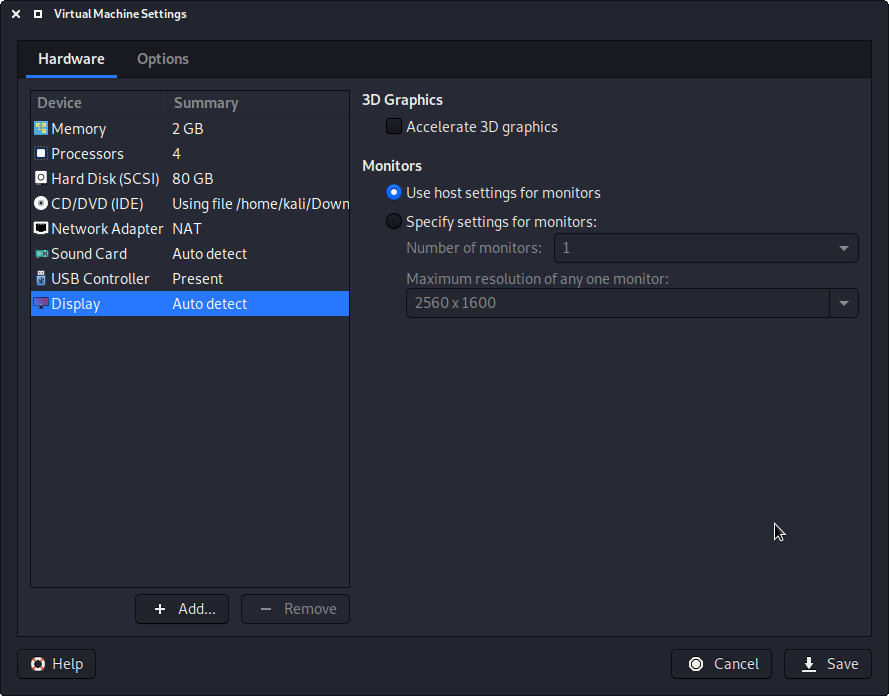
Another item to point out is in the “Display” section. Make sure that “Accelerated 3D graphics” is disabled, as people have reported that causes issues.
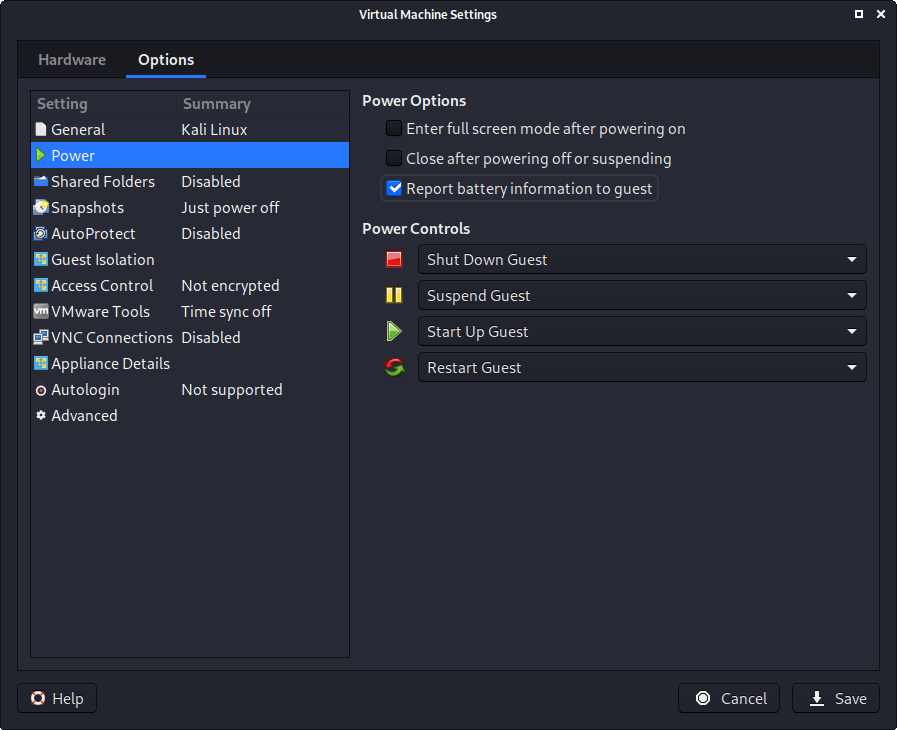
We then move over to the “Options” tab, and move down to “Power”. We choose to enable “Report battery information to guests”, as it is a handy thing for users who use Kali on a laptop/notebook.
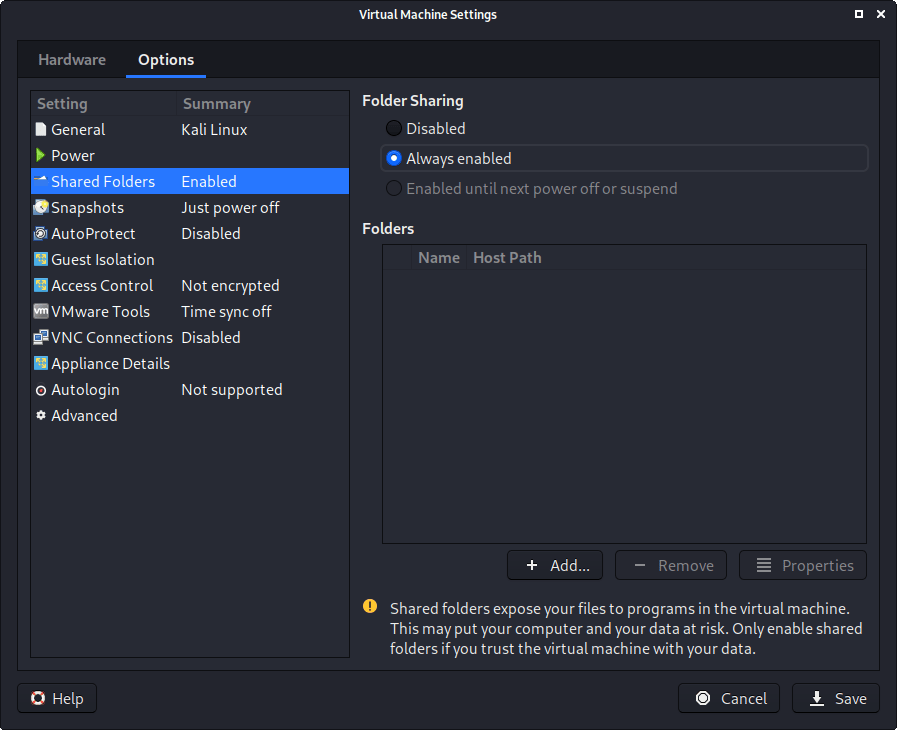
In “Shared folders”, we select “Always enable”. At this stage, do not share any paths, as some users may not wish for it.
The final option we alter is “VMware Tool”, where we enable “Synchronize guest time with host”.

After all this is done, we save, start up the VM, and then continue installing Kali Linux as we normally would for a bare metal install.
During Kali Linux setup process, the install wizard should detect if its inside a VM. If it is, should then automatically install any additional tools (such as open-vm-tools ) to give a better user experience. If you want to manually re-install it, you can see our VMware Guest Tools Guide.
Updated on: 2021-Nov-15
Author: g0tmi1k
Кали линукс для vmware
You can install VMware workstation or player on Kali Linux, allowing you to use Virtual Machines (VMs) inside of Kali Linux. However if you wish to use Kali Linux as a virtual machine, you will want our Kali Linux Guest VMware guide.
VMs are great, as there are many reasons why to use them. One of the being, able to run multiple Operating Systems at the same time. You can have your host machine “untouched”, and then only interact with the guest VMs. Another is when something is going right, take a snapshot. When something goes wrong, revert back.
VMware Workstation & Fusion is a commercial software (there is VMware Player which is free but it is limited in features). There are various free or open source solution (such as VirtualBox, QEMU, KVM/Xen with virt-manager).
Preparation
Before trying to install VMware, please make sure your version of Kali Linux is up-to-date, and if required, reboot the machine.
Download
Alternatively, you can do the following command line method.
When everything is up-to-date, and ready to go, make sure the file is executable and then call it.
We can see we have installed VMware Workstation 15.5.1. The version number may be needed later on.
After the installer is installed, you should be able to just run vmware to continue setup.
At this point, you should be be straight forward, often just clicking through.
Setup
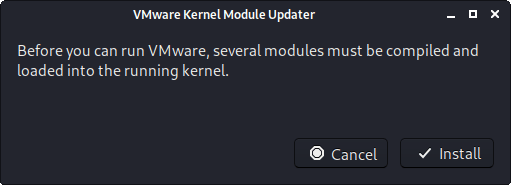
The first part may be VMware Kernel Modules.
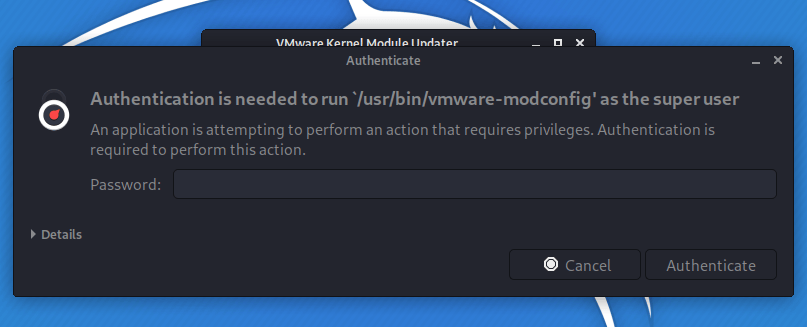
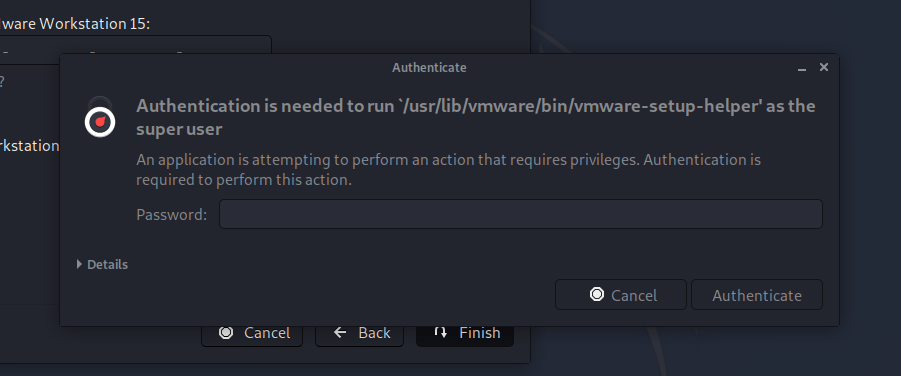
If vmware wasn’t called with superuser privileges, you may be prompted for a password.
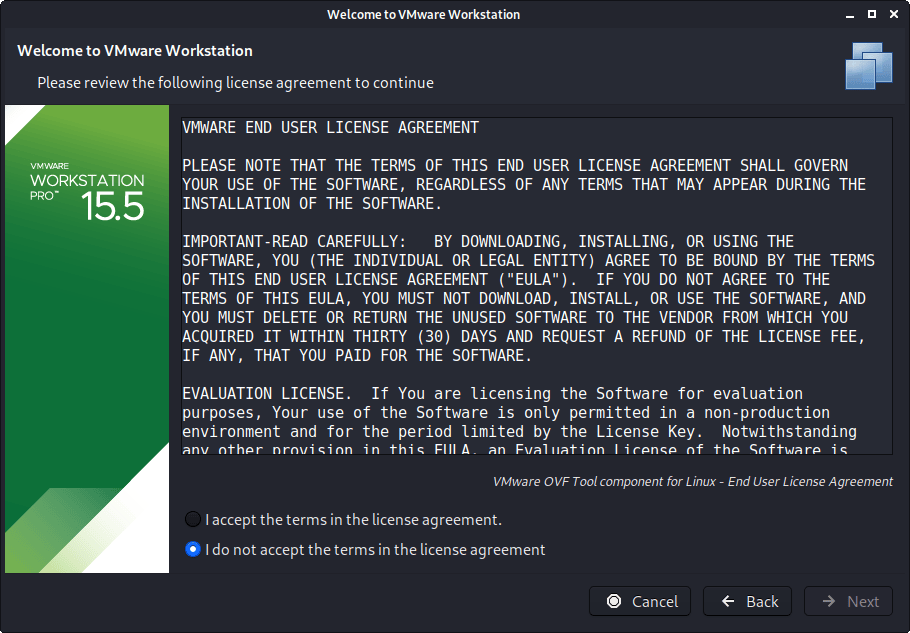
You will need to accept the legal agreement.
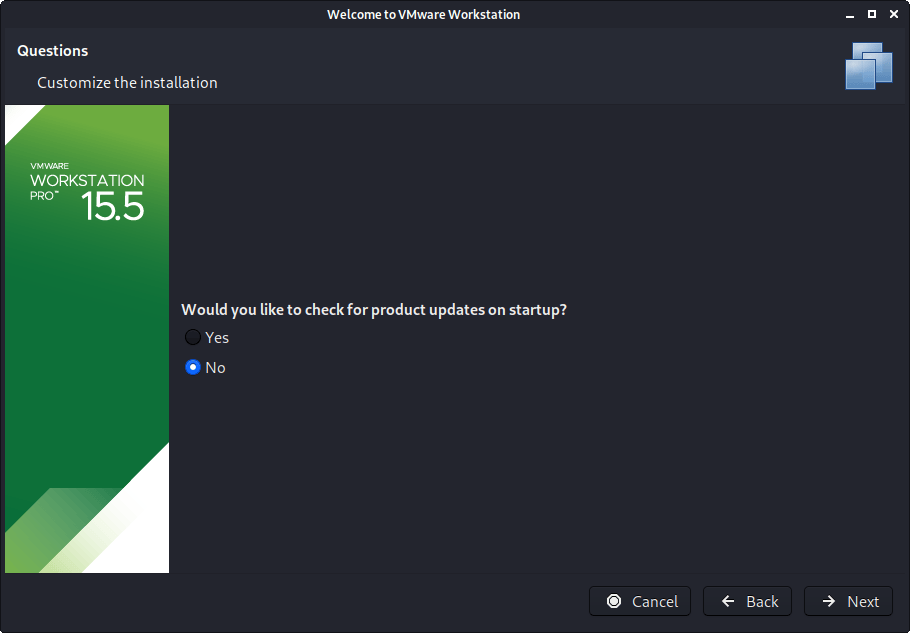
You may wish for it VMware to check for any updates.
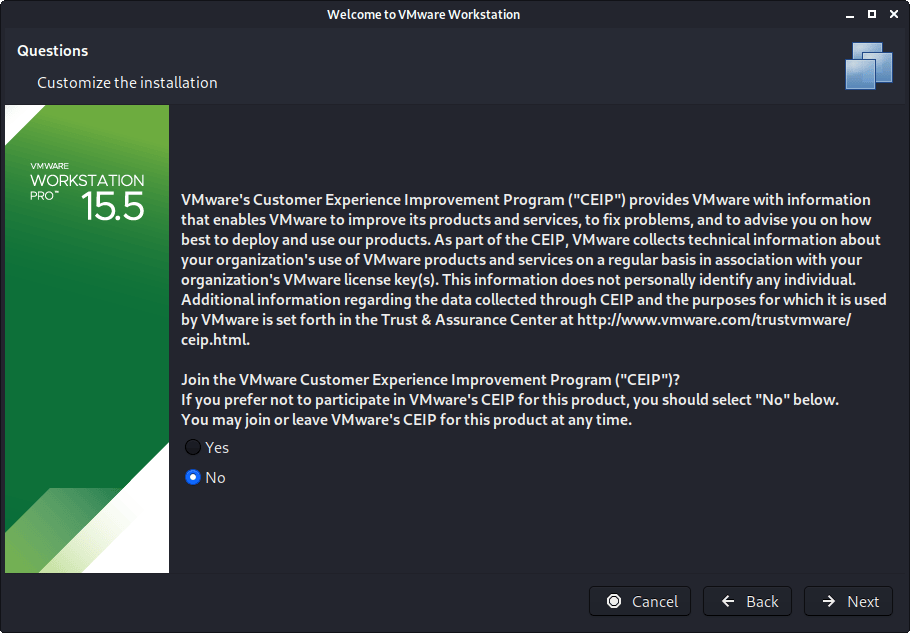
You may wish to join “VMware Customer Experience Improvement Program”.
Enter the current username.

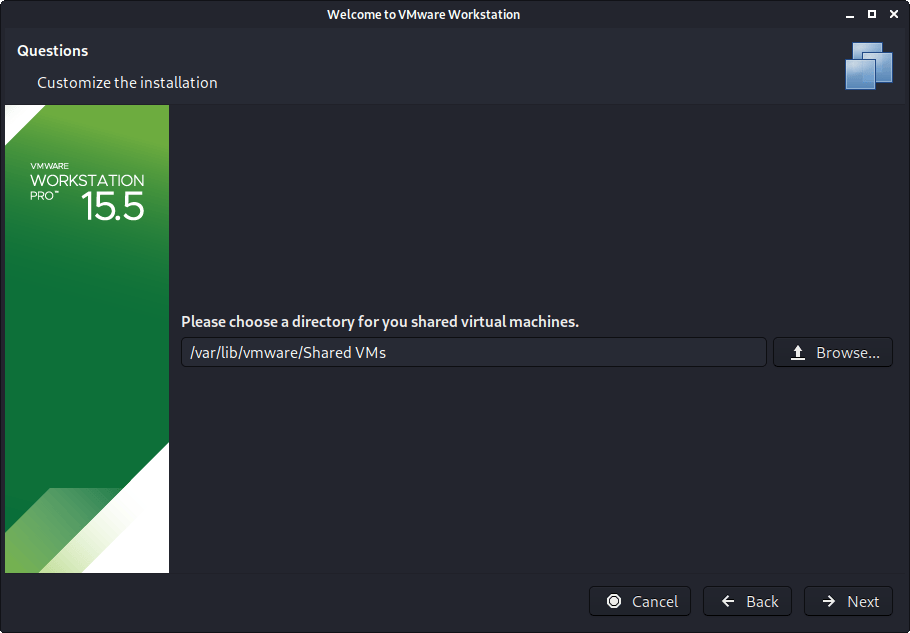
Enter a location for Shared VMs (this is different to each users own VMs).
Enter a port for HTTPS access

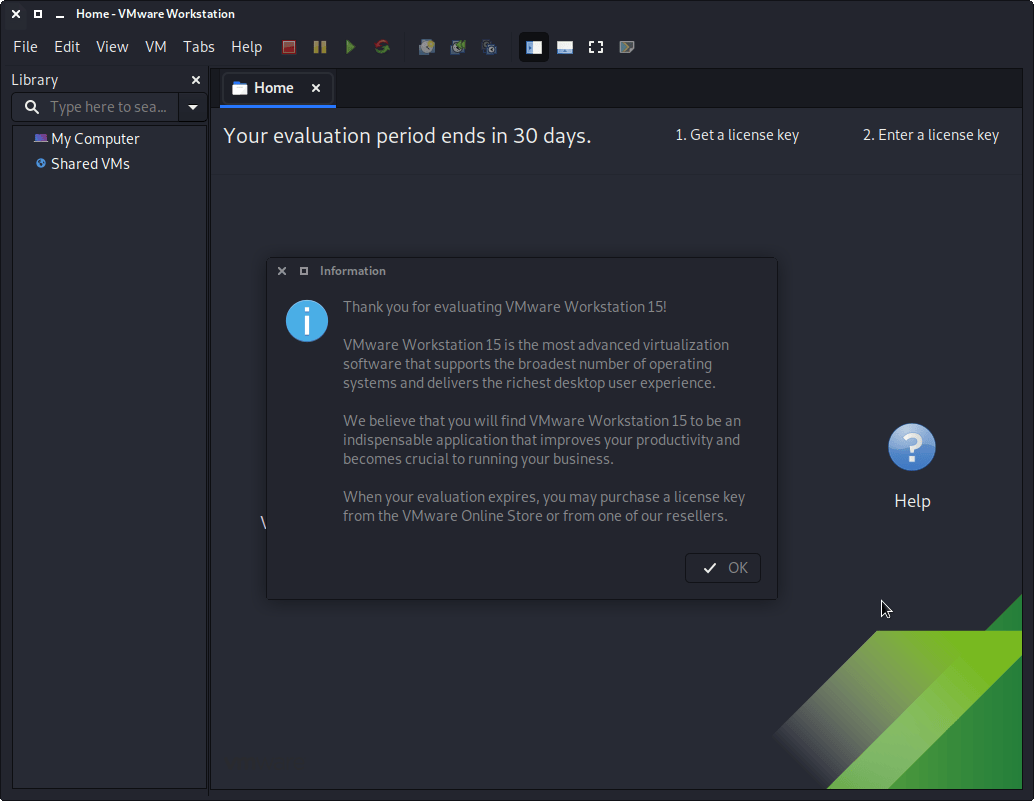
If you have a product key, you can enter it now, else it will be a trial for 30 days.

You may be once again prompt for superuser privileges if you didn’t execute the setup file with it.
The final screen should look like this.
If you now wish, you are able to install Kali Linux in a VMware VM (on Kali Linux).
Troubleshooting
libaio missing
Try installing the libaio1 package.
Missing Packages
From time to time, things may not go right. There could be a number of reasons why VMware may not install. The first thing to check would be you have all the necessary packages installed.
Try running vmware again, and see if now setup continues.
Too Newer Kernel
A common issue is because the setup file for VMware isn’t supporting the latest kernels, which could be an issue as Kali Linux is a rolling distribution and receives frequent updates. If this is the case, we can patch VMware modules to support this.
Try now to install VMware, by doing vmware.
If you are still having issues, you may need to restart your Kali Linux before trying one more final time.
vmware-host-modules + Kernel Updates
As VMware has various kernel modules, we need to make sure they are kept up-to-date and re-patched when Kali Linux’s kernel gets updated. This can be achieved by the steps in the following guide.
Still can’t start up VMware? vmware-modconfi
If VMware is unsuccessful, we can dig a little further by running the following.
Looking at the output, may either give us the exact issue, or at the very least something to search the Internet for.
Can’t Power on a Virtual Machine
You may also face the following issues, when trying to power on a VM.
The quickest solution to fix these would be to reboot Kali Linux and try again.
Updated on: 2021-Nov-15
Author: g0tmi1k
Как установить Kali Linux на VMware Workstation
В статье мы подробно расскажем, что такое Kali Linux и покажем, как проходит установка Kali Linux на VMware Workstation Player.
Что такое Kali Linux
Kali Linux — это дистрибутив ОС Linux. Его разработала американская компания Offensive Security, которая занимается тестированием на проникновение, информационной безопасностью и цифровой криминалистикой. Kali создавался для проекта по проведению тестов на безопасность. В основу его разработки легли такие проекты, как Auditor Security Collection и WHAX.
Kali создан на базе двух дистрибутивов: Debian и BackTrack. BackTrack — это ПО, специально созданное для тестирования безопасности и проведения цифровой криминалистической экспертизы. Первая его версия появилась в 2006 году в формате LiveCD. Уже через шесть лет, с появлением Kali Linux, BackTrack потерял свою актуальность.
В дистрибутив Кали входят такие программы, как Metasploit, Nmap, Aircrack-ng, Ettercap и сотни других приложений и инструментов для пентестинга. С помощью встроенных инструментов Кали можно:
Сейчас Kali Linux очень активно развивается, новые версии дистрибутива выходят раз в несколько месяцев.
Кому подойдет Kali Linux
Kali стал популярен благодаря сериалу «Mr. Robot» — в картине все взломы и тестирования проходят именно с помощью этой операционной системы. Фигурирование Кали в сериале вызвало резкий рост интереса к ОС среди обычных пользователей. Однако ОС не подходит для решения повседневных задач. Дело в том, что в Кали отсутствуют стандартные офисные программы и пользователь по умолчанию в ней root.
Kali Linux активно используют как добросовестные специалисты по информационной безопасности, так и хакеры и хакерские группировки. Кто чаще всего использует Kali Linux:
Кали Linux можно установить как с помощью ISO-файла, так и с помощью готового образа. В инструкциях ниже мы покажем оба способа настройки.
Как установить Kali Linux на VMware Workstation
Запустите Workstation Player и нажмите Create a New Virtual Machine:
Нажмите Browse и в локальной папке компьютера выберите ISO-образ Kali Linux. После этого кликните Next:
Кликните на строку Linux. Так как Kali Linux разработана на основе Debian, выберите в выпадающем списке Debian 10.x 64-bit и нажмите Next:
Введите имя виртуальной машины и выберите директорию для установки. Вы можете оставить параметры по умолчанию и нажать Next:

Выберите объём диска виртуальной машины. Для установки Kali Linux будет достаточно 20 ГБ. Также выберите тип диска — от него зависит, как будет храниться виртуальная машина:
Затем кликните Next:
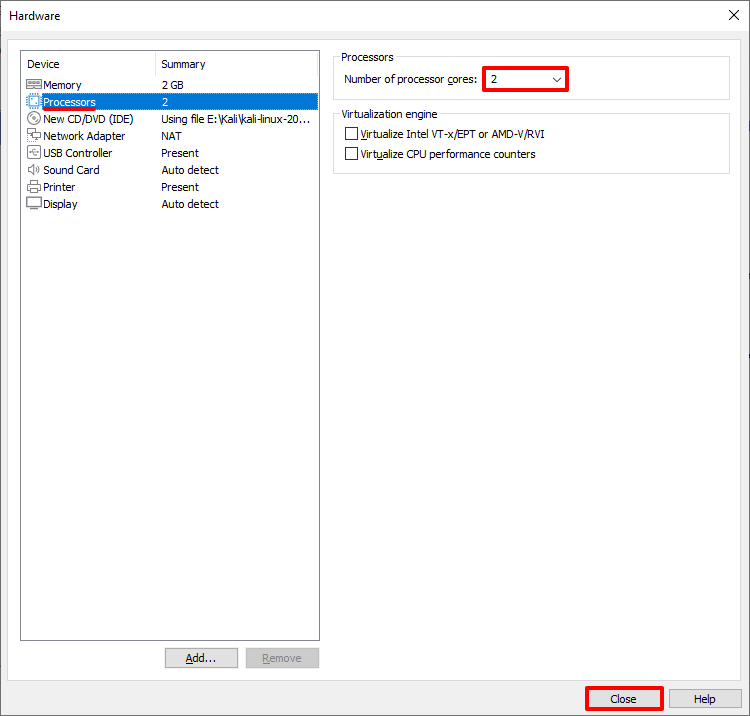
По умолчанию для виртуальной машины выделяется одно ядро процессора. Для лучшей производительности выделите как минимум два ядра. Для этого нажмите Customize Hardware:
Затем нажмите Processors и в выпадающем списке «Number of processor cores» выберите значение 2. После этого кликните Close:
Чтобы завершить настройку, нажмите Finish:

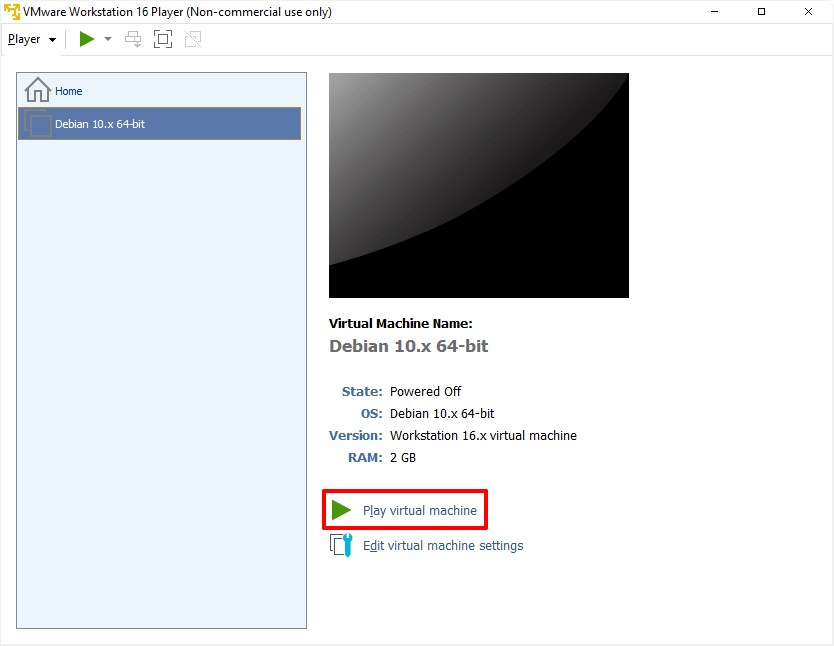
После этого запустите виртуальную машину:
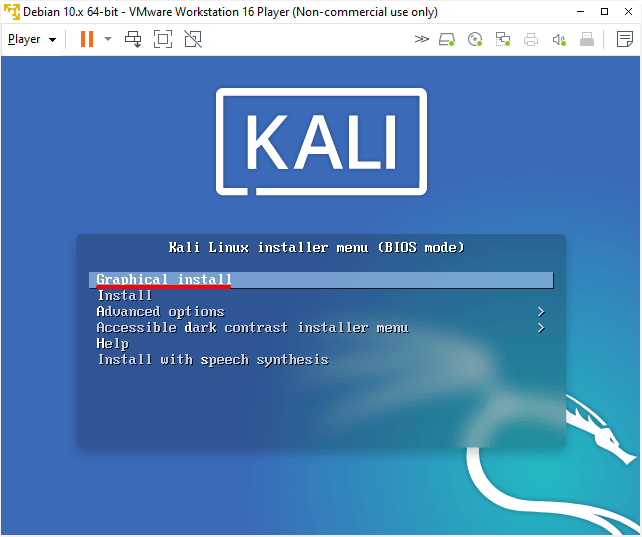
Нажмите Enter, чтобы выбрать установку с графическим интерфейсом. Это самый простой способ установки ОС без работы в командной строке:
Готово, установка завершена.
Как запустить готовую виртуальную машину Kali Linux на VMware Workstation
Запустите WMware Workstation Player и нажмите Open a Virtual Machine:
Откройте папку с файлами виртуальной машины, выберите файл в формате .vmx и нажмите Открыть:
Виртуальная машина появится в списке. Запустите её:
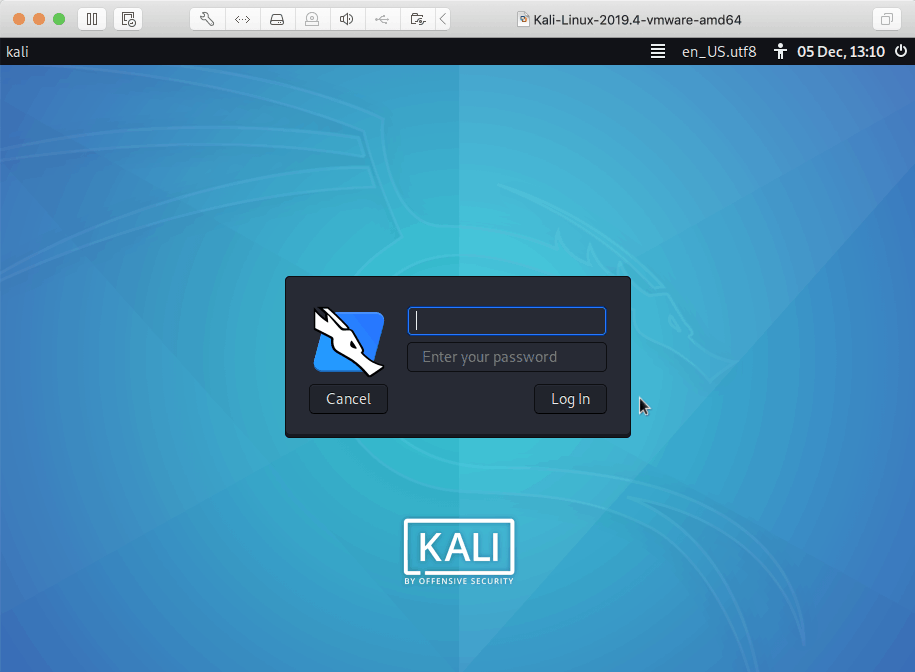
Нажмите I copied It и дождитесь загрузки операционной системы:
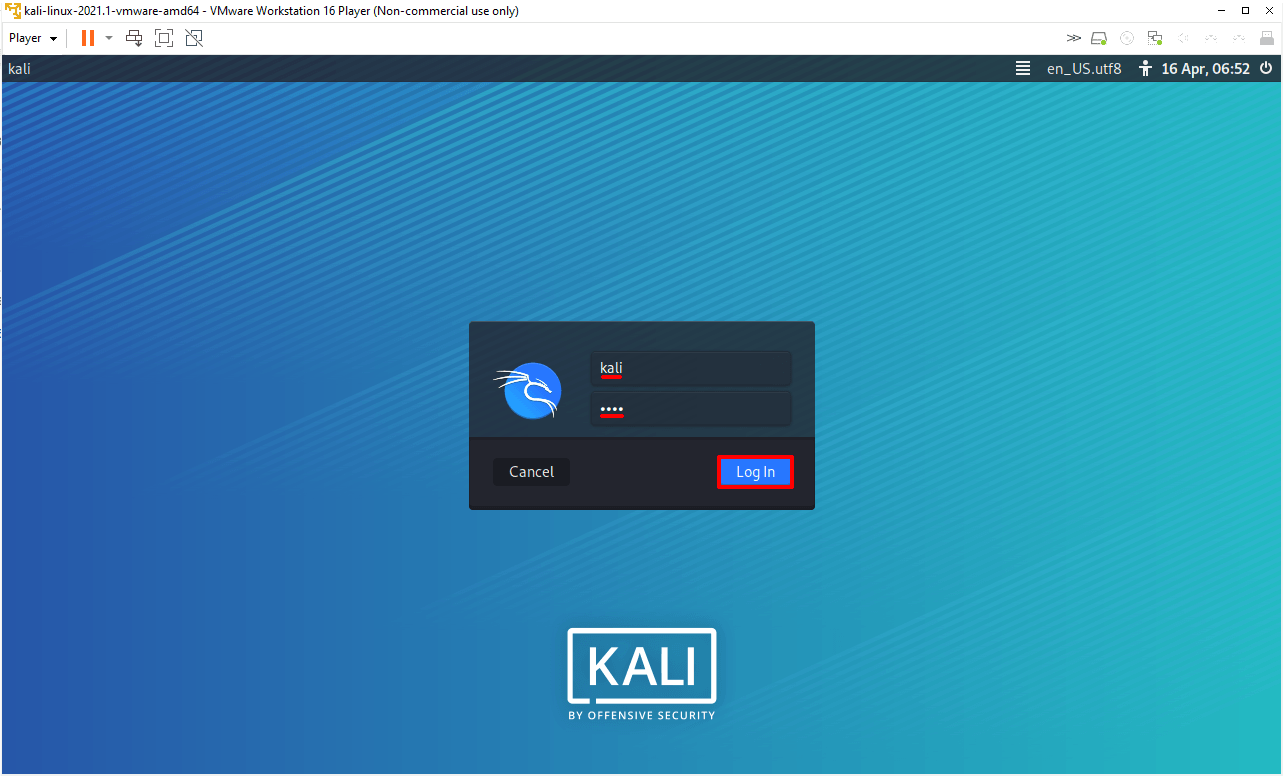
Введите логин и пароль для входа в систему:
Затем нажмите Log In:
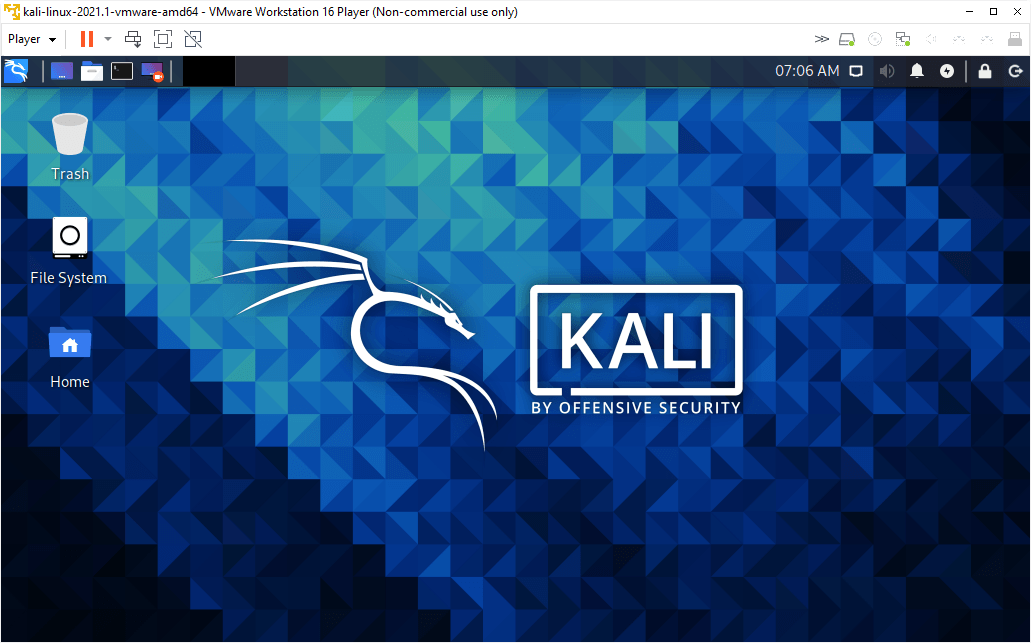
Готово, вы запустили операционную систему:
Теперь вы знаете, каким способом можно установить Kali Linux на VMware Workstation и сможете быстро создать виртуальную машину по одной из наших инструкции.
Kali Linux VMware – The Complete 2021 Guide
Kali Linux is a popular and powerful Linux distribution that comes with many security tools built right in. If you have ever head of BackTrack, BackTrack became Kali Linux in 2013. It is a Debian based distribution. A distribution like Kali is important for security professionals because it comes with so many tools baked into it, and is easy to deploy a fresh instance of.
Today we are going to look at two things that are quite important, Kali Linux and VMware.
When I say VMware, I mean on whichever VMware platform you may choose. I say install, but the fact is that Kali is super easy to get running on any VMware platform, especially since Kali provides a VMware image available for download. There are many confusing guides out there when it comes to Kali Linux and VMware, so I am going to try and keep things as simple as possible.
What is Kali Linux VMware?
Kali Linux VMware is an instance of the Kali Linux distribution running on a VMware based virtual machine. There are several different ways you can implement Kali Linux on VMware such as VMware Workstation Player, VMware Workstation, VMware Fusion, VMware ESXi, and VMware vSphere.
Let’s take a closer look at all of these options.
Understanding Kali Linux VMware
Many people are looking to use Kali with VMware, but may not be very familiar with VMware. VMware makes it easy to run Kail on your laptop along side your usual OS, or in the data center.
When someone is talking about Kali Linux VMware, they probably mean one of the following things:
Luckily, I know a lot about VMware and I have access to all of these platforms. I will show you how to install Kali Linux on each of them by using the Kali VMware image provided by Offensive Security.
Which VMware platform you use one you use is really up to your requirements and what computer hardware you have available. VMware products come with a free day trial, so you can try several different platforms before you decide.
VMware Resource Basics for Kali Linux
Before we get started, there a few things to keep in mind when running a virtual machine on top of your existing Windows or Mac OS.
First and foremost, you need to understand the resources in your machine. Remember, you are running another machine on top! This means you you always need to give your virtual machine LESS resources than the total you have available, since your base Mac or Windows OS still needs to run!
The good thing is that Kali is a fairly lightweight distribution. The minimum Kali install requirements are 128 MB of RAM and 2 GB of hard drive space. Again this is a minimum, and 2GB of RAM and 20 GB of hard drive space are a better place to be. The good news is as long as you have a fairly recent computer, you should be fine with this.
The only realistic issue you may have is a small SSD that is approaching full.
Be sure to check the resources on your computer or server before you get started. I tested Kali Linux on my Surface Pro running Windows 10 that only had 4 GB of RAM and it was usable without major issues.
Getting Kali Linux for VMware
Kali Linux comes in two main forms: images and VMs. While you could install a Kali image on a VMware virtual machine, it is much easier to use download and use the Kali VM.
You can download the Kali VM image here. This is the one you want.
For this guide I am going to use the Kali Linux VM image for VMware. Why? It is the simplest way to get started.
Sure, you could download the Kali ISO image, create a blank VM, and install it, but why bother when there is already a VM image that is easy to deploy.
We will be opening the VMX file in the VMware platforms we use to run Kali in.
A VMX file is a file that tells the VMware software what the components of the VM are, from how much virtual RAM and how many CPUs, to the virtual drivers used, to the virtual hard drives used. It makes VMware understand the rest of the files you extracted when you downloaded the VM.
Kali Linux and VMware Tools
VMware tools is an important piece of software for any virtual machine. Think of it as the equivalent of hardware drivers for a physical machine. Things like your keyboard, mouse, and display, need VMware tools to function properly.
There are many things out there about Kali Linux and VMware tools, and VMware tools and Linux in general, so I want to take a few moments to clear things up.
There are two main packages of this software. First, is VMware Tools, which is maintained and packaged by VMware tools with their products.
The second version is a package called open-vm-tools which is simply just the Open Source version of VMware Tools, and is maintained on VMware’s GitHub. This allows a greater contribution from Linux distributions instead of VMware maintaining it. In fact, VMware recommends using open-vm-tools if it is available for your linux distribution.
The truth of the matter is that open-vm-tools is now included in most Linux distributions, Debian and Kali Linux included. If you download the Kali VM image, it is in there already, and there really isn’t anything else to worry about.
The reason I’m bringing this up is that you can easily end up in some terrible Internet rathole if you start trying to research this on your own and don’t understand some of this background.
Now that we know the basics, let’s take a look on how to run Kali Linux on all of the various VMware platforms.
Running Kali Linux on VMware Player / VMware Workstation Player
I have to admit, I haven’t used VMware Workstation Player since my very early days of virtualization, and have always preferred full on VMware Workstation.
The main drawback of VMware Player is that you can only run one VM at a time, which does not usually fit my use case.
However, if you are looking to run a single Kali Linux VM this may be a good use case for VMware Player for you.
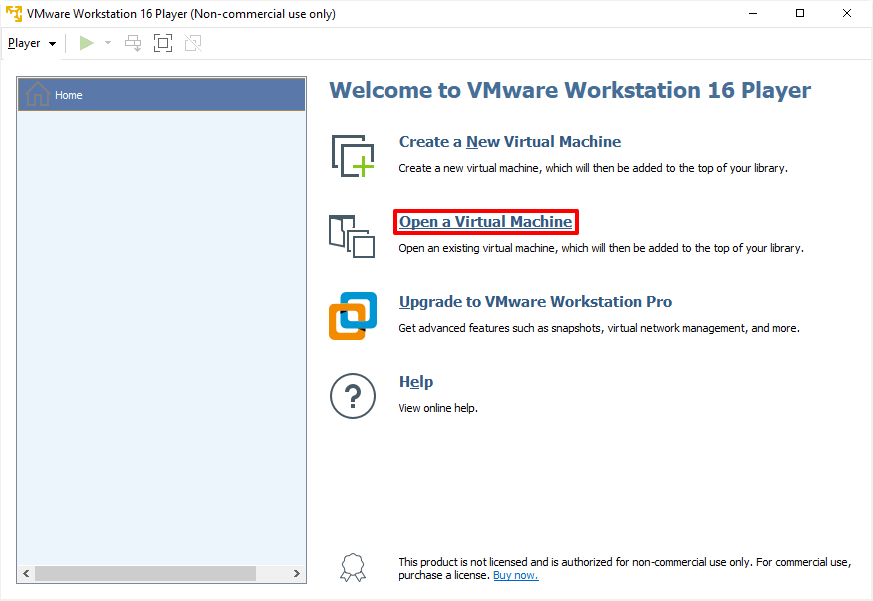
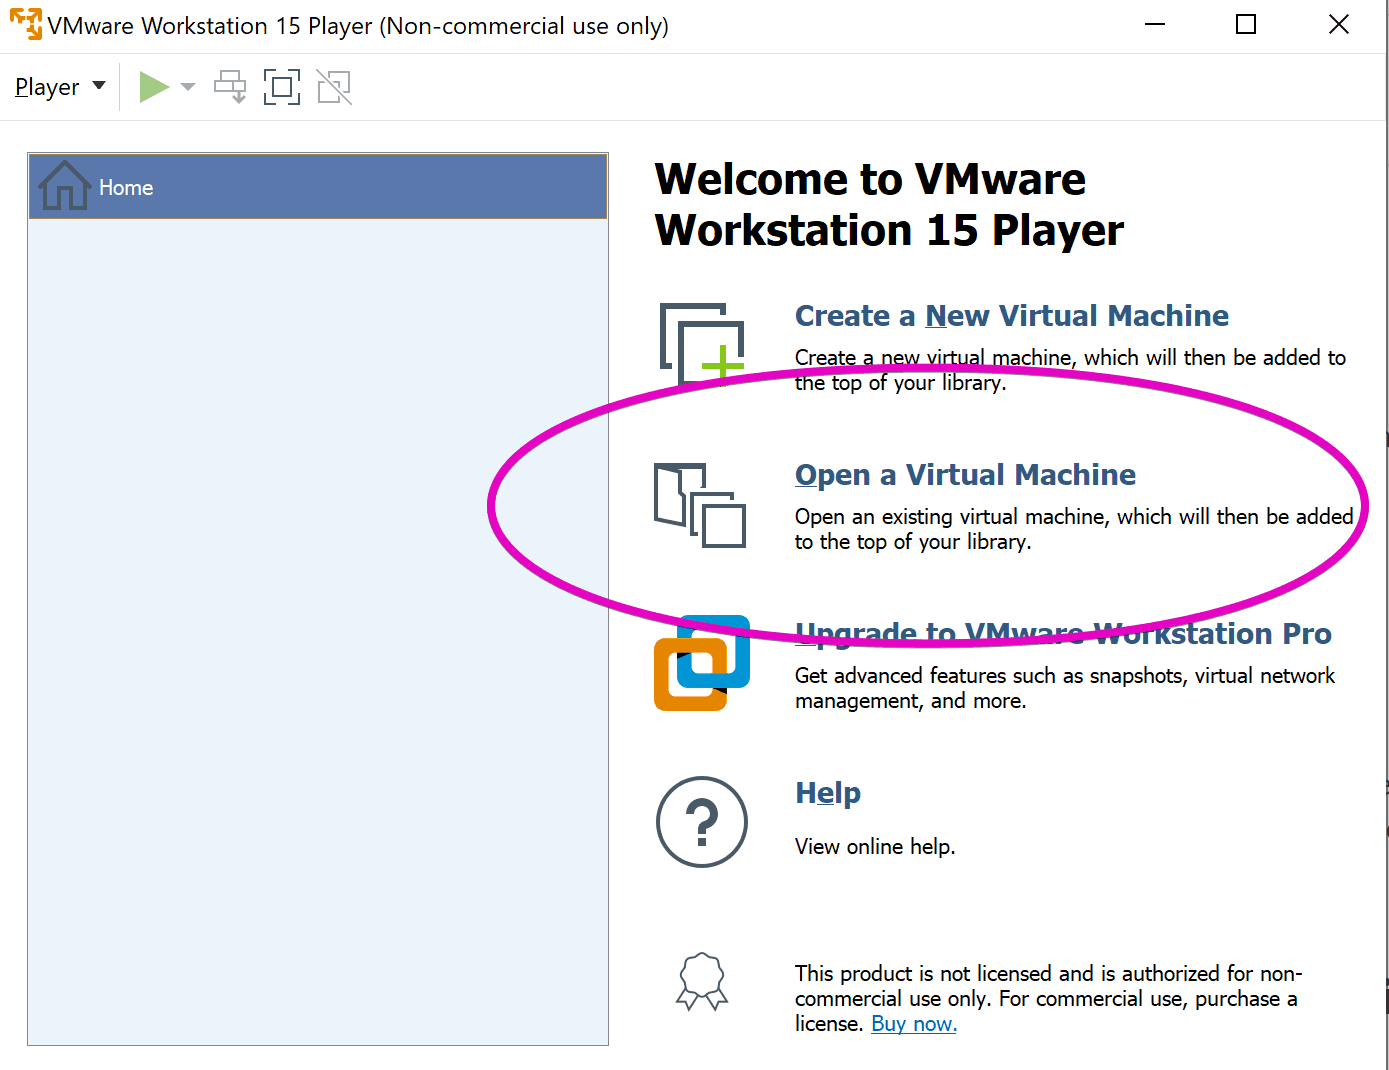
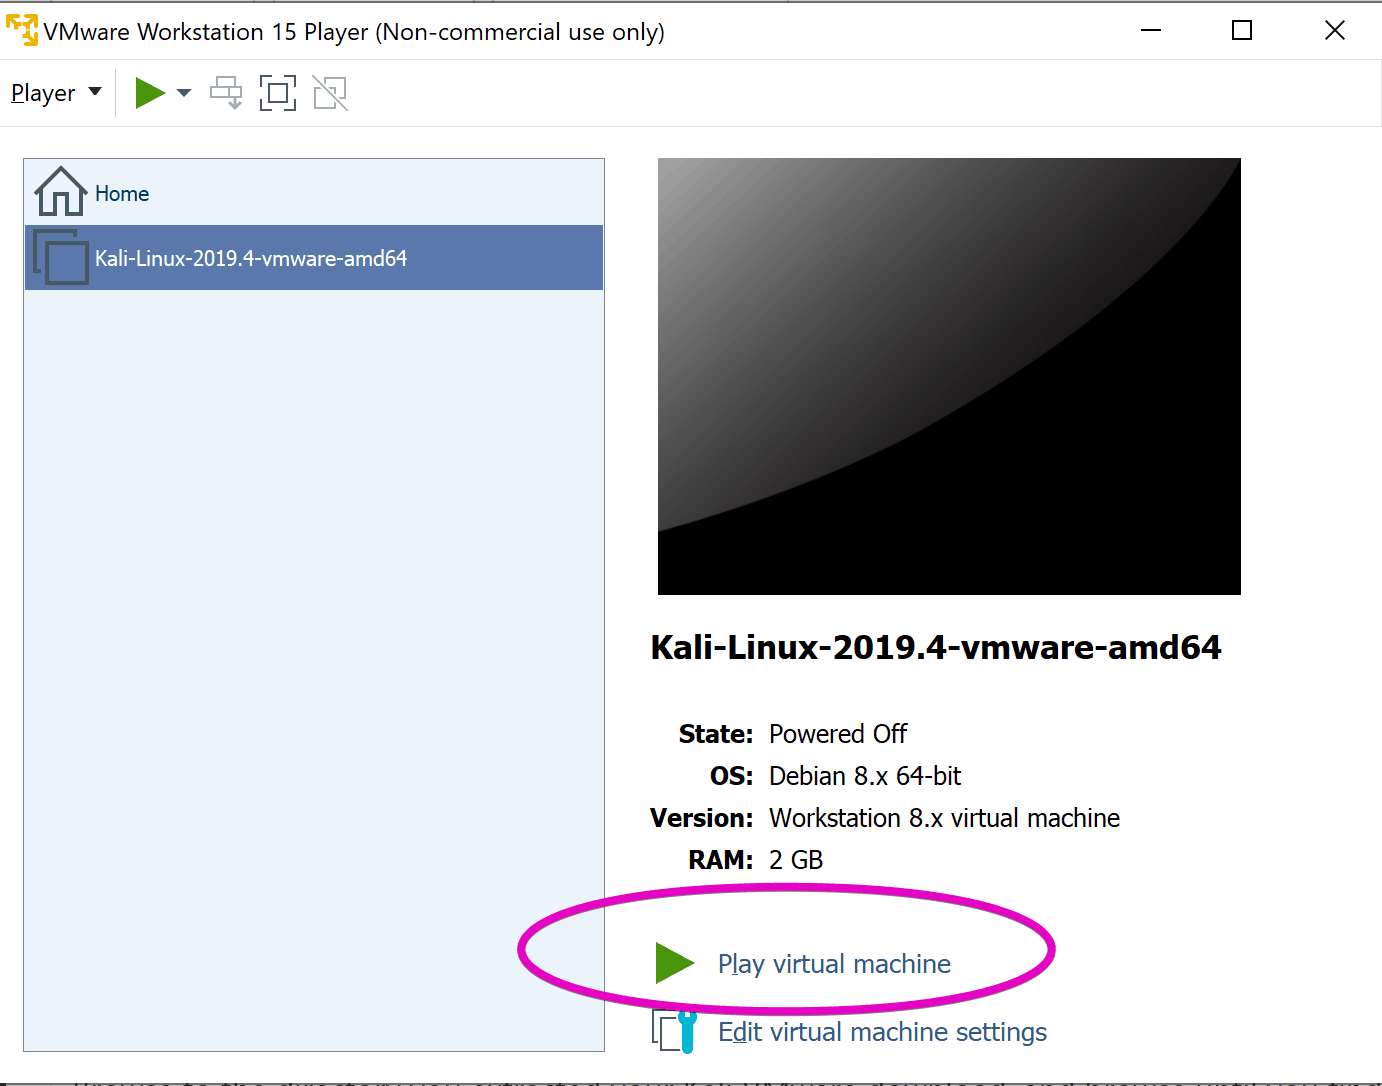
After running the wizard based installation for VMware Workstation Player, launch it. Select Open a Virtual Machine.
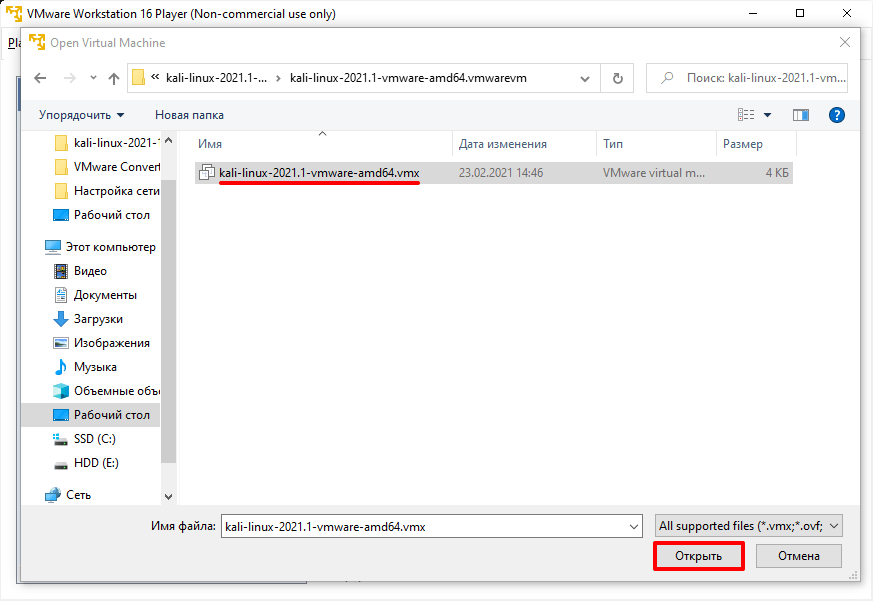
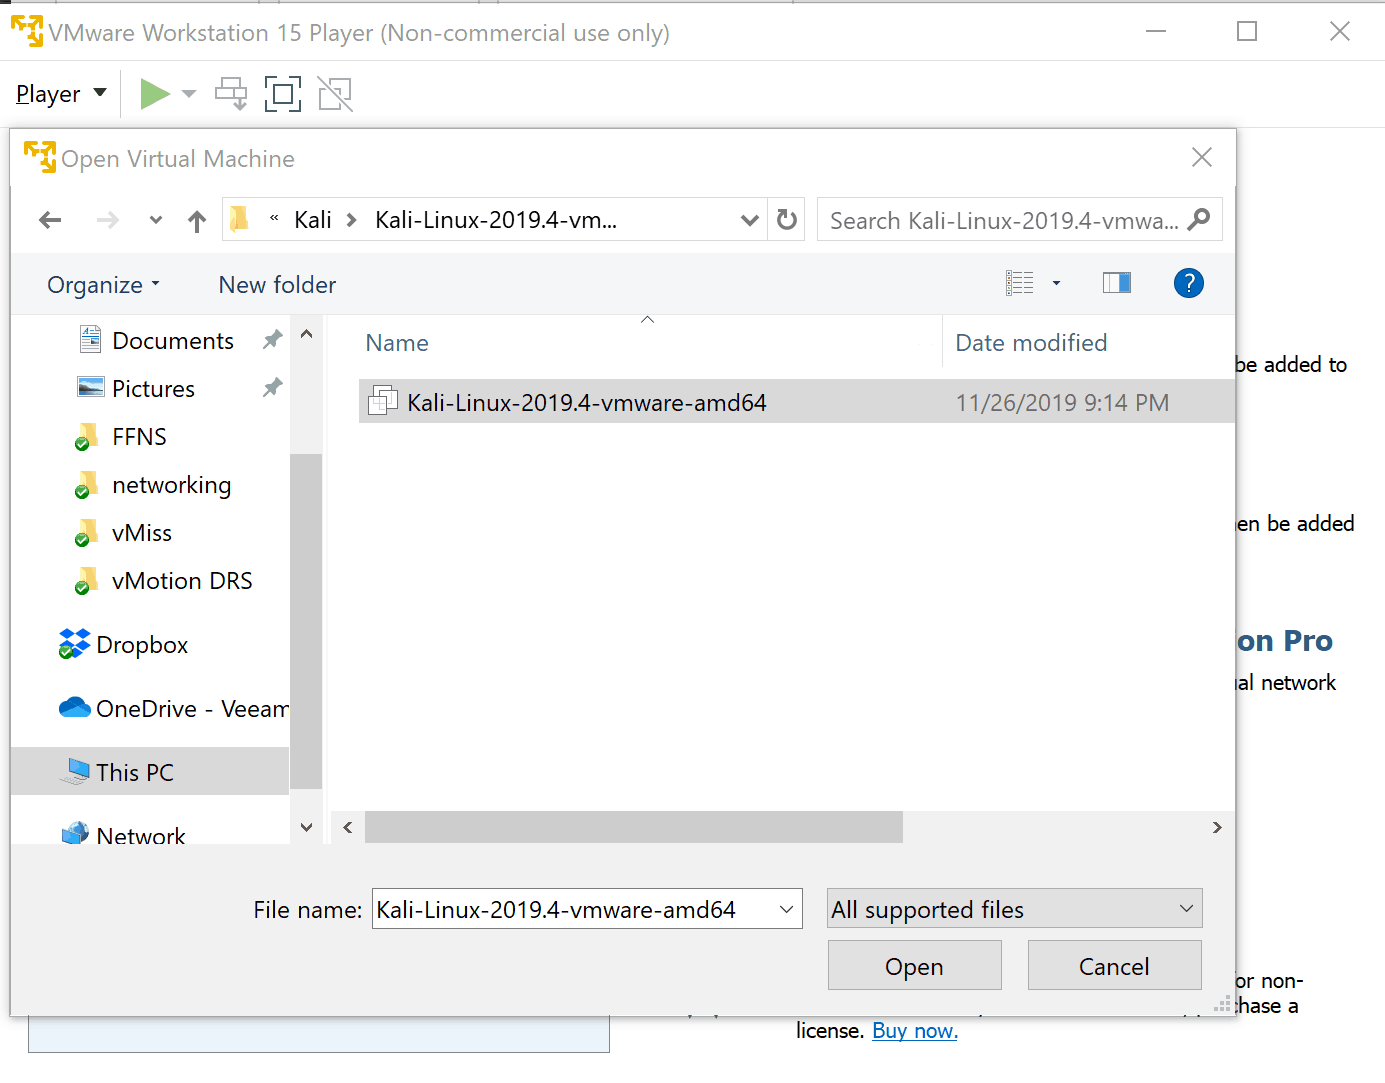
Browse to the directory you extracted your Kali VMware download, and browse until you find the file you can open:
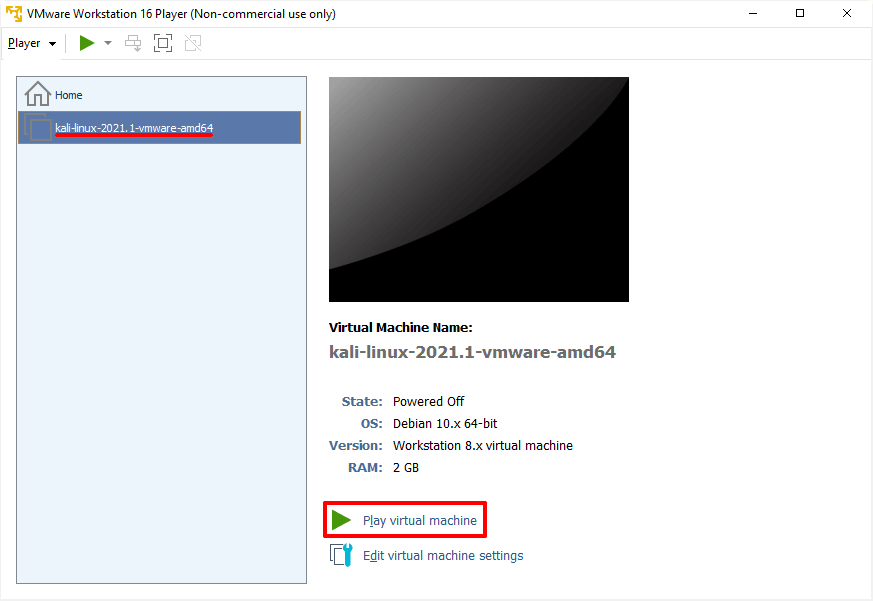
Click open. You will now see the VM available. Click Play VM to start the Kali Linux VM.
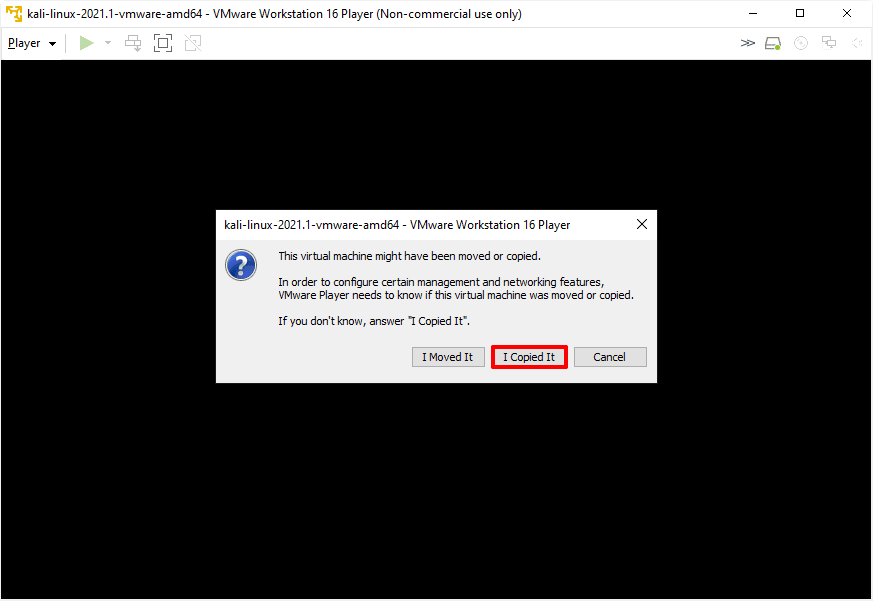
When the VM starts, you will see the following dialog box asking if your VM was moved or copied. Select I Copied It.
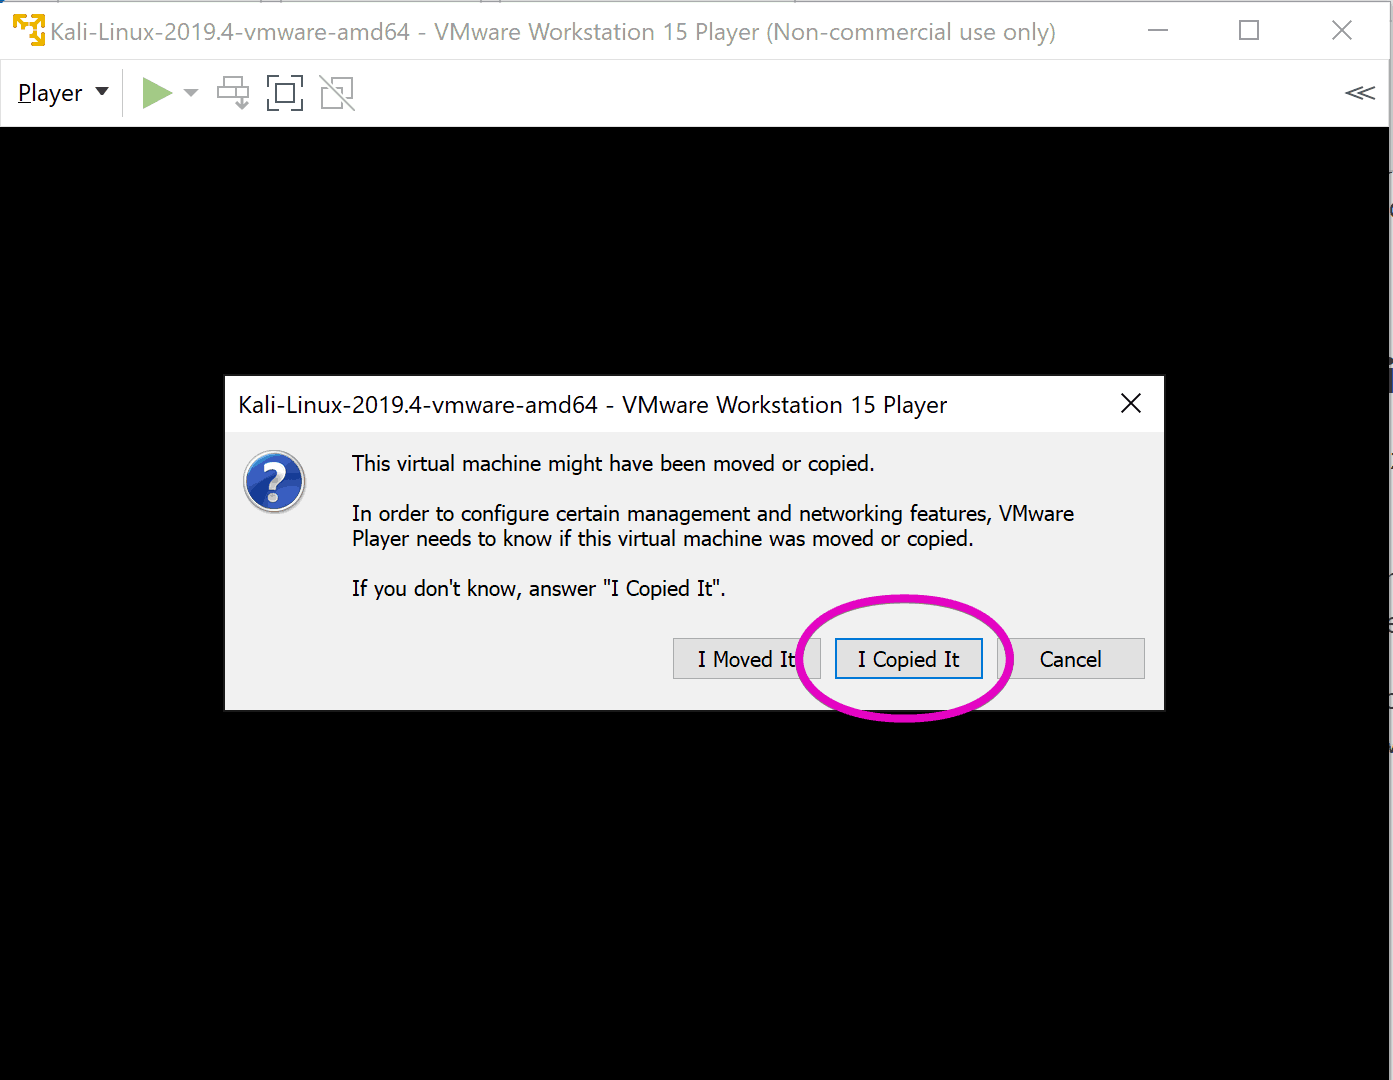
Now, you will be able to log into Kali Linux with the default credentials listed on the Kali VM download page. That’s it!
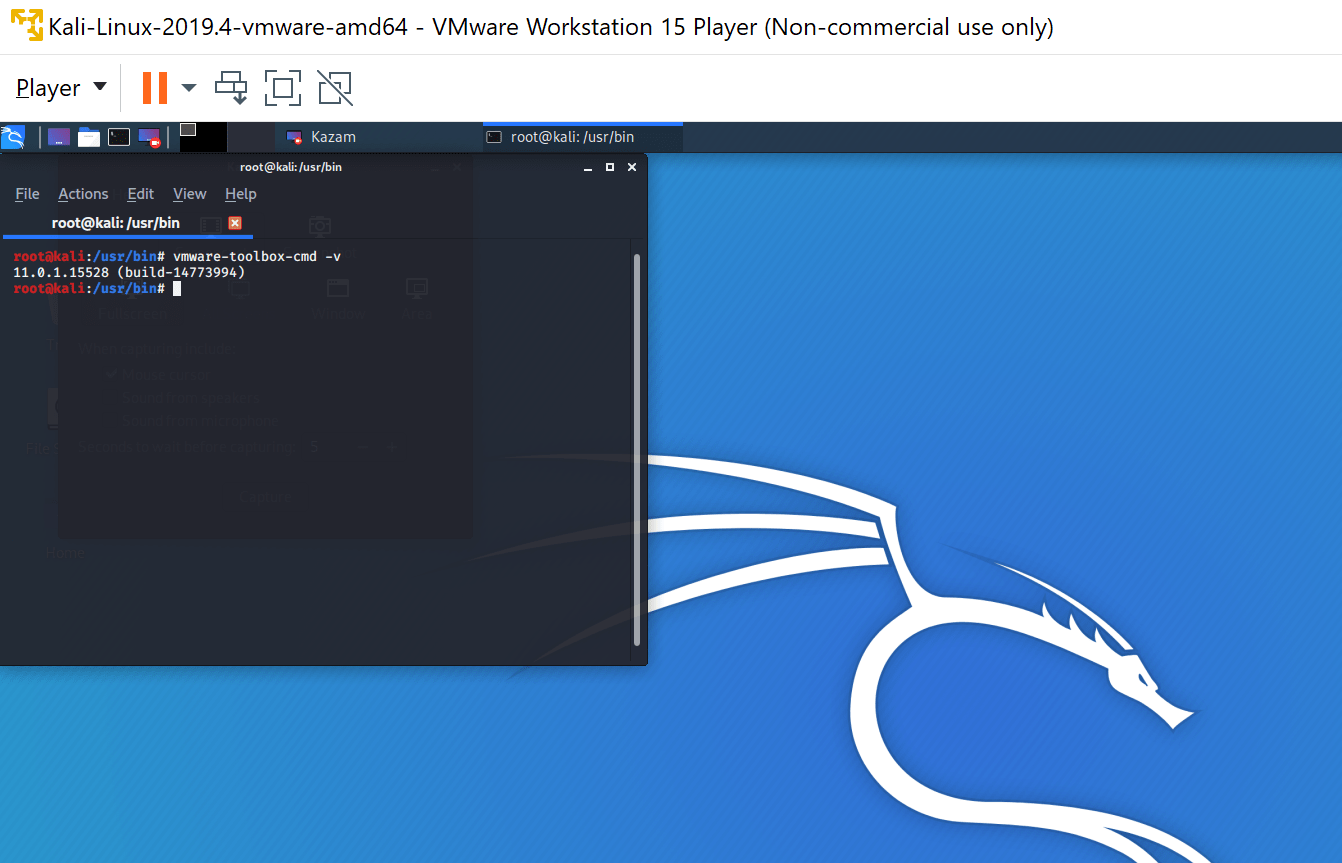
You can see the VMware Tools build number listed as build-14773994. A quick google tells me this is the most recent build for both VMware Tools and open-vm-tools. You can find the list of open-vm-tools builds here. If you are ever confused about the version of a VMware product, just Google the build number.
Running Kali Linux on VMware Workstation Pro
First, start by installing VMware Workstation Pro. You can download VMware Workstation Pro here. Workstation Pro comes with a 30 day trial, but after that you will need a valid licence key.
After installing VMware Workstation Pro, select Open a Virtual Machine.
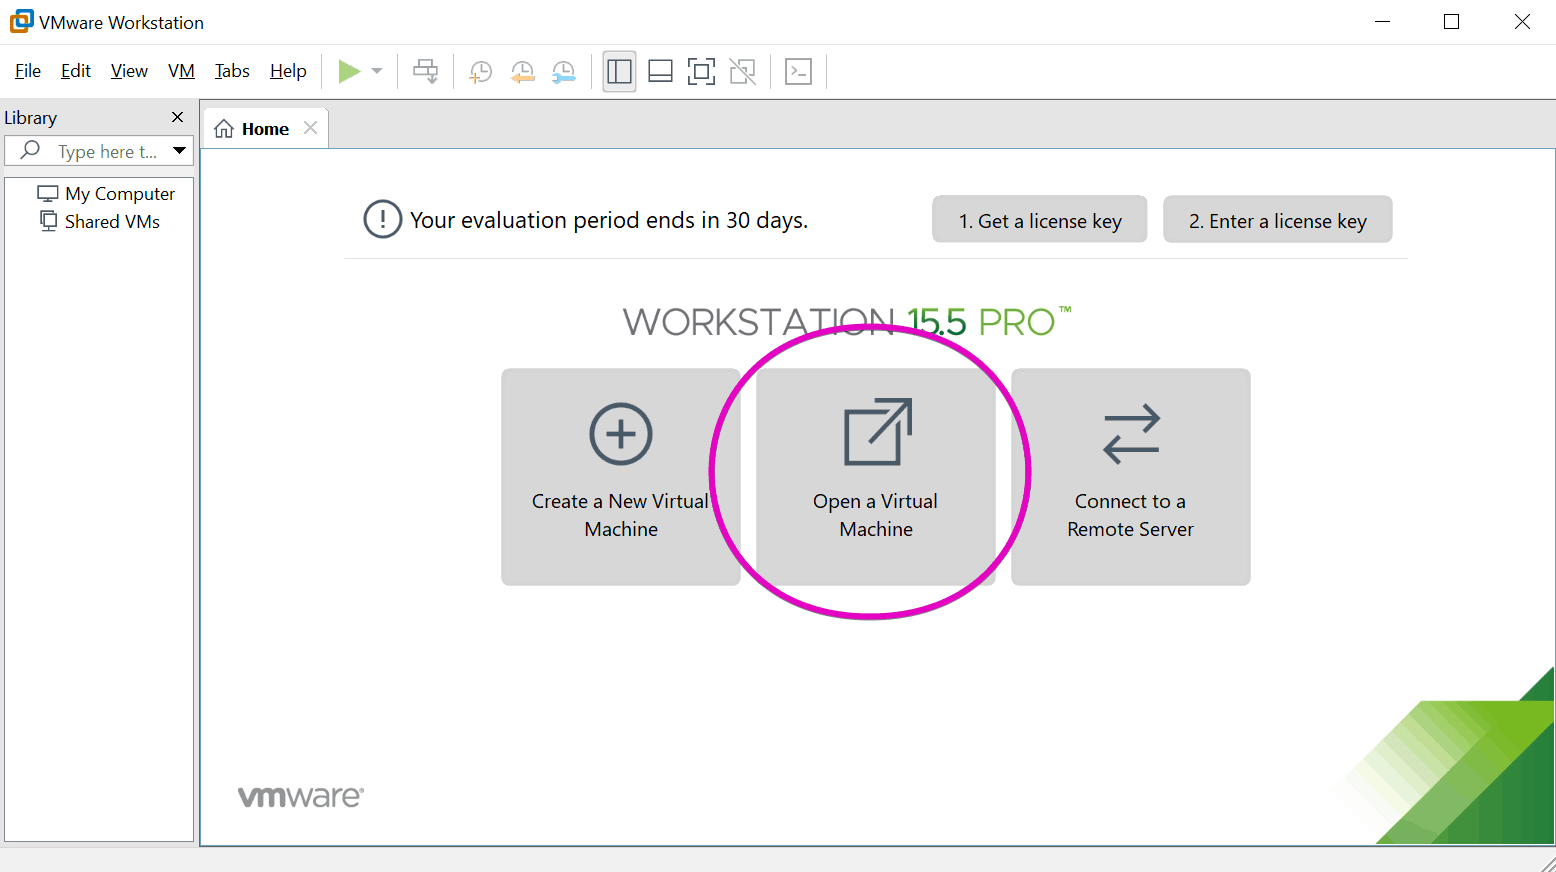
Browse to the directory you extracted the file to, and open the file you see.

Click open. You will now see the Kali Linux VM. Click the Play button or Power on this virtual machine to start the VM.
After you start the VM you will see a message about the VM being moved or copied. Select I Copied It.

That’s it! You are ready to go once the VM finishes starting up. You can log into the image with default password listed on the Kali VM download page.
Running Kali Linux on VMware Fusion
First download and install VMware Fusion. You can find VMware Fusion here, there is a 30 day free trial before you will need to purchase a license.
Install VMware Fusion. After installing VMware Fusion, start the program.
From the file menu, select Open.

Browse to the directory you extracted the Kali Linux VM to. Click Open. You will see a black window pop up with a play symbol in the middle. Press play and prepare for the onslaught of popups.
When you are asked if you want to Upgrade the VM say yes.

The rest of the pop ups pretty much look the same with different text.
The next pop up will the familiar dialog box that asks you if you moved or copied the VM. Select “I copied it”.
You’ll see yet another dialog box about VMware Tools. Remember, open-vm-tools is in the image, so just click OK.
Your VM will then start, and you will be running Kali Linux on VMware Fusion on your Mac.
Running Kali Linux on VMware ESXi (vCenter Managed or Standalone)
Of all the VMware platforms, ESXi may be the hardest one to get Kali running on, especially if you have never used ESXi before. If you are familiar with ESXi, you probably already know how to do this, but even so there are a few caveats.
If you are new to ESXi, this guide will help you get Kali up and running.
At this point, the assumption is that you have downloaded Kali linux, and have an ESXi host, either standalone or managed by vCenter.
Standalone ESXi just means you aren’t using VMware vCenter Server to manage it. The free edition of ESXi is a great tool to have in your lab, so I think it is worth covering how to get Kali running there.
Converting Your Kali VM to the ESXi Format
The Kali Linux VM is provided in the format for VMware Workstation, Player, and Fusion. ESXi uses a slightly different format, so if you try to just put this image into ESXi, you are going to have a bad time.
First we need to convert it with a product called VMware vCenter Converter Standalone or just vCenter Converter. It is a free product, but you will need to register with VMware to download it. Unfortunately it is only available for Windows.
When you install VMware Converter, choose a Local Installation during the install wizard. You will then need to reboot after the installation.
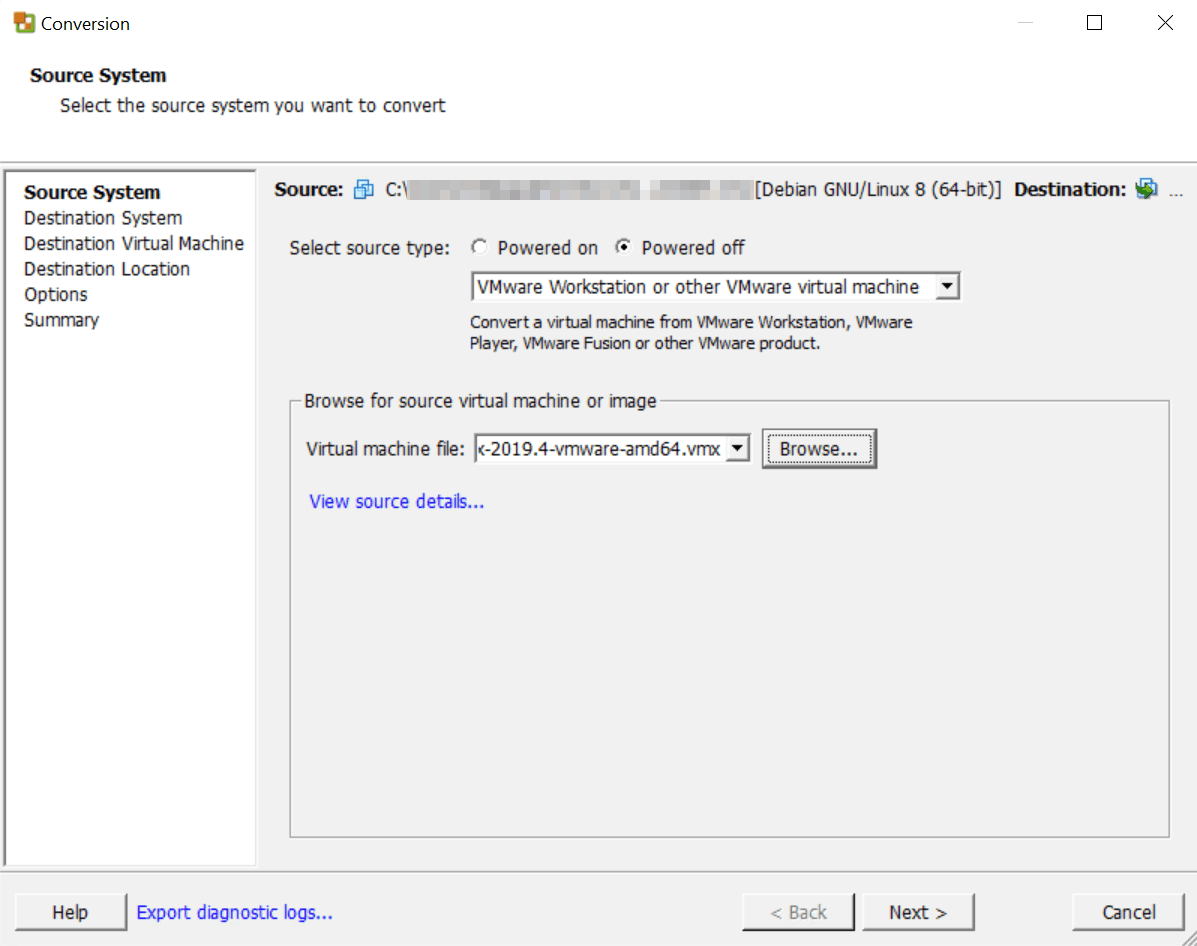
After your Windows system reboots, start the VMware converter application and select Convert Machine.

Next, the wizard will load and start with source system. Select the Powered off source type, then VMware Workstation or other VMware virtual machine from the drop down menu. Browse for where you extracted Kali linux to and open the VMX file.
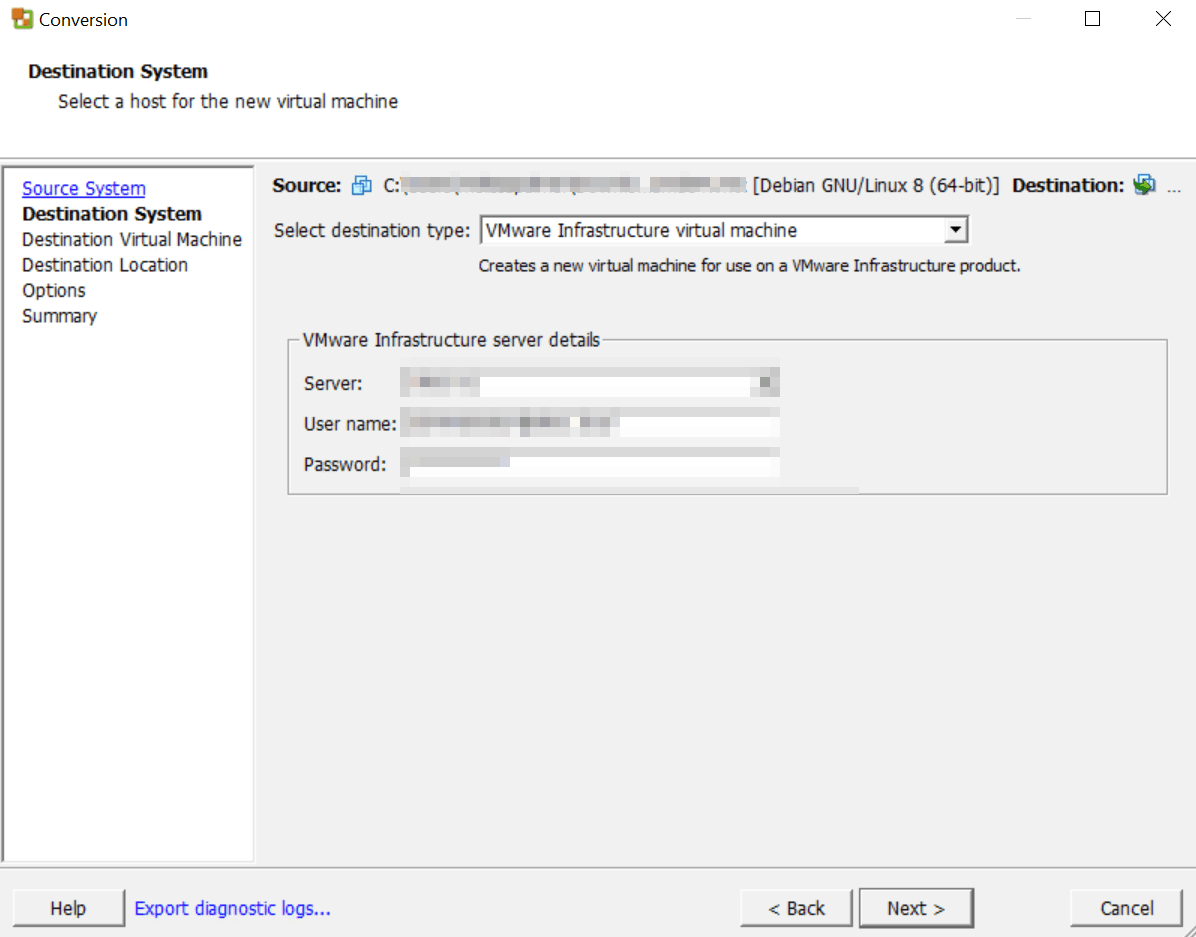
Next, we need to say where we are going to send the Kali Linux VM. Either enter the server name of your standalone ESXi host OR your vCenter Server and the credentials in the VMware Infrastructure server details section.
Next, select where you are sending your VM. If you connected to a standalone host, you would not see as many options under inventory. Be suer to select the appropriate datastore if you have more than one.
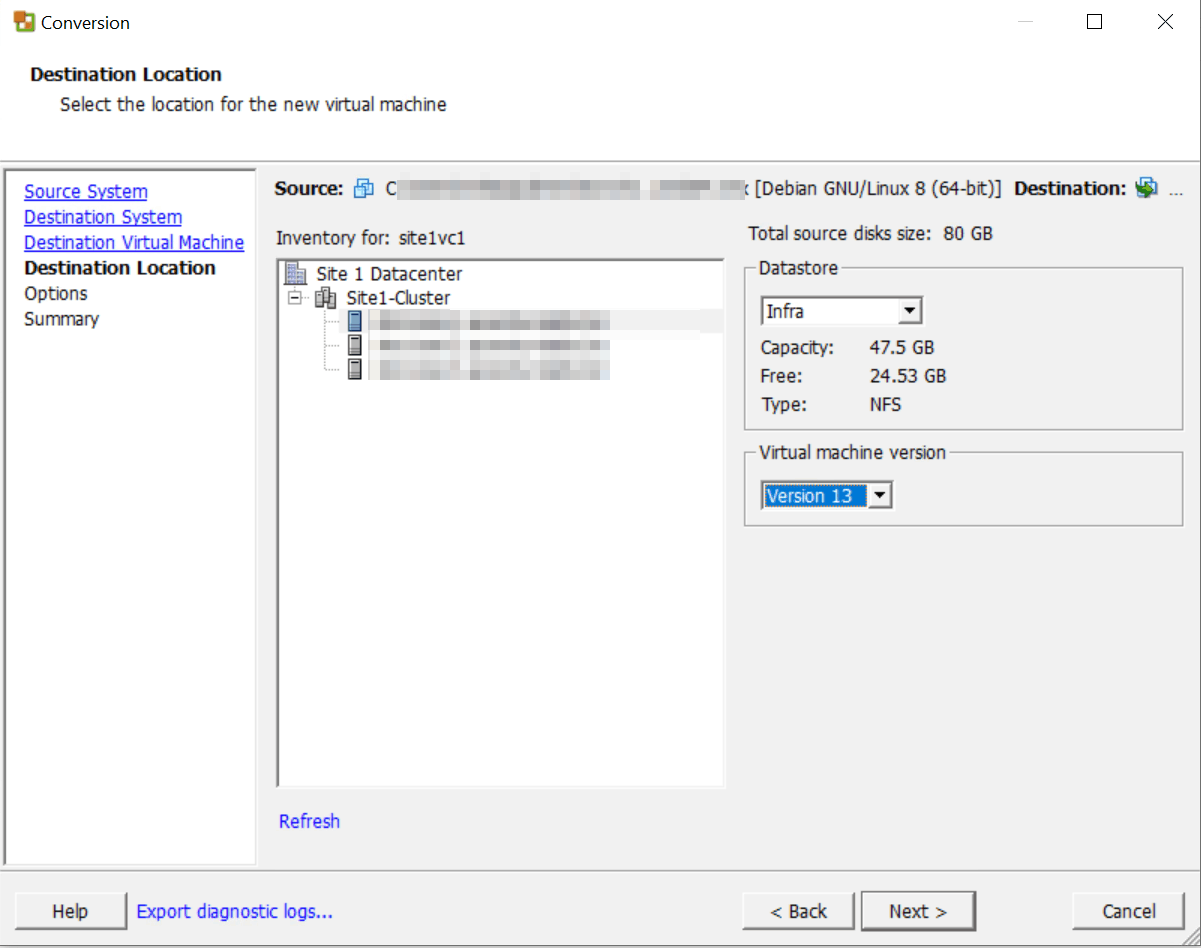
Now, you can see there are the settings of your VM itself. There are a couple of things to note.
This VM will provision as thick by default, meaning it will reserve 80 gigs of space during conversation. If you want to change this to thin, where it will take up less space, edit the the Data to copy section.
Another good section to edit is the Networks section, and select the network on your ESXi host so you can start the right up when it is finished.
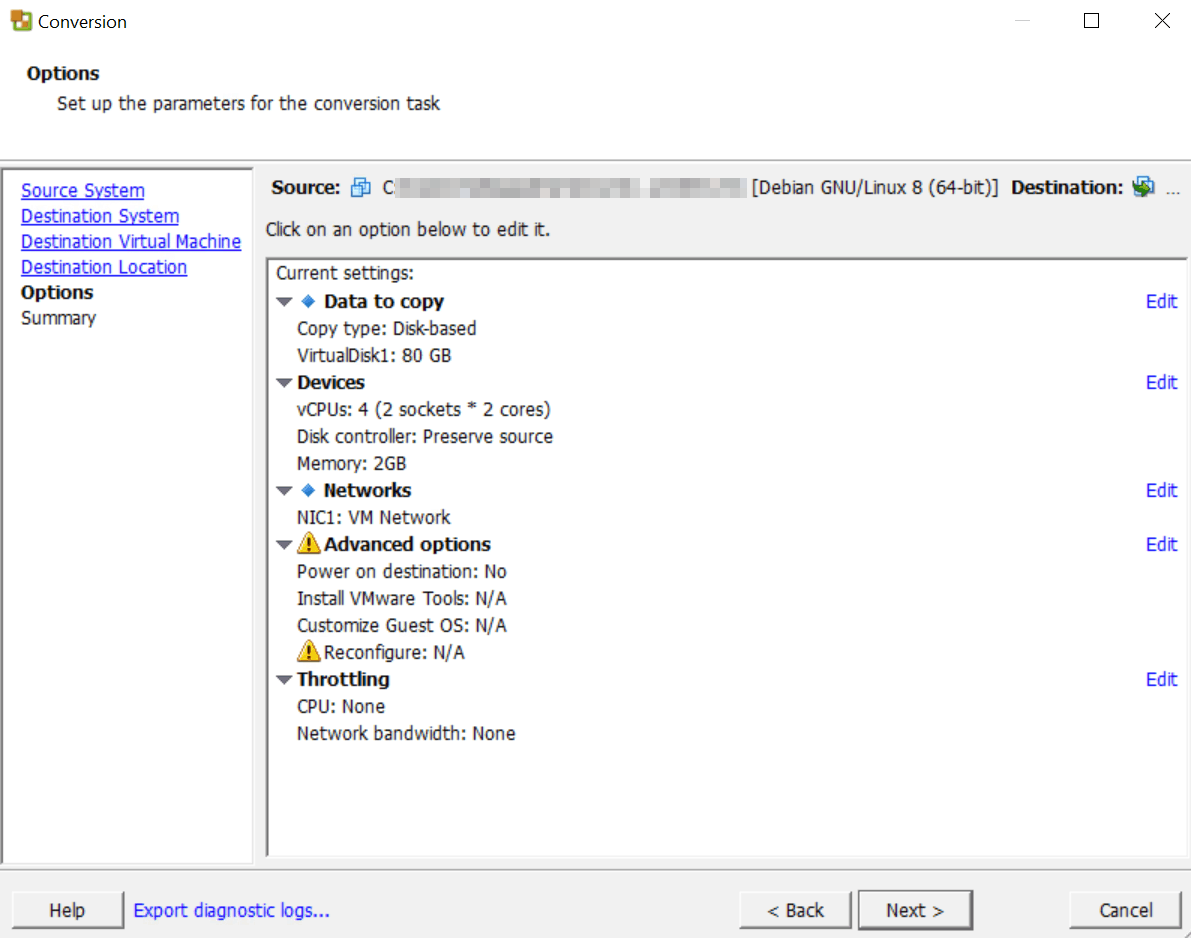
We’re almost done! Click Next and you will see a summary page of what you are about to do. If everything looks right, click Finish, and wait for your VM to finish converting.
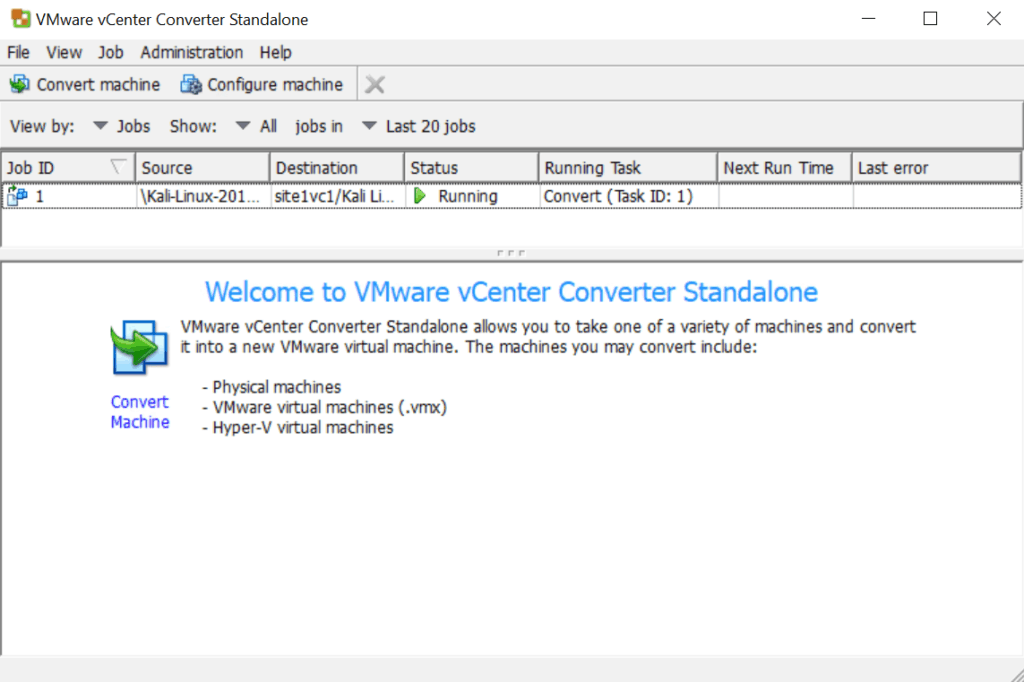
It is done when you see the Status as Inactive.
Next, log into vCenter or your ESXi host, and you will see the VM there! Power it on, and you are ready to go. You can right click the VM in the left navigation pane and select power on, or click the VM and hit the green play button in the main part of the screen. That’s it!
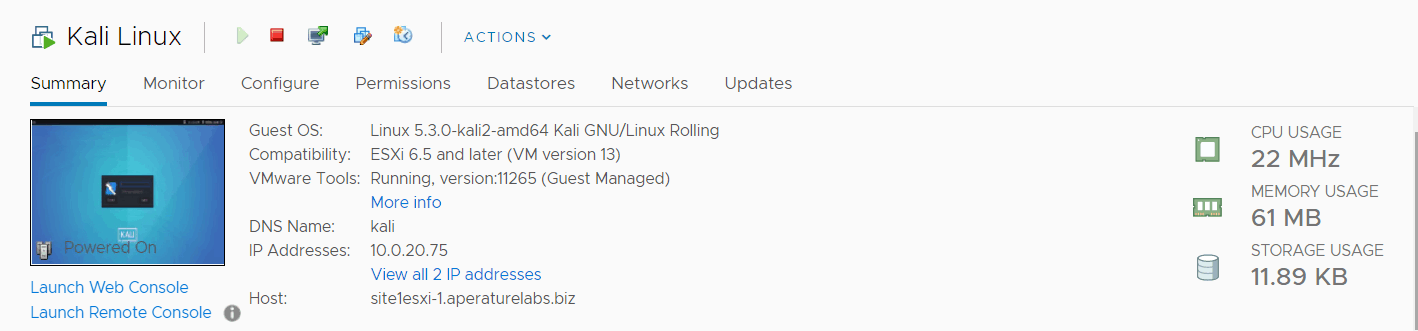
You now have your Kali Linux VM image running on ESXi!
Don’t have access to a Windows machine? Unfortunately you’re going to have to use the Kali ISO and build a fresh virtual machine from scratch.
Kali Linux and VMware, Perfect Together!
I hope this guide was helpful for you getting started with Kali Linux VMware. While yes, you could certainly create a new virtual machine in any of these platforms, then install Kali with an ISO, using the Kali VM is a much easier route.
Let’s recap what VMware platforms you can use the Kali Linux VM on one more time:
Which VMware Platform you use is up to you, but there are of course a few obvious choices. If you are using a Mac, you will need to use VMware Fusion for Kali Linux.
If you are using Windows or Linux, you can use VMware Player or VMware Workstation. VMware Player is a free choice for non-commercial use but you will only be able to run one VM at a time.
Finally, if you have a lab where you are running any form of ESXi, you can use VMware Converter to convert the VMware image to an image usable by ESXi. This does take a few extra steps, but it is possible.
You do need a Windows machine to run converter on, so if you don’t have access to Windows, you’ll need to build a new Virtual Machine from the ISO. Be sure to convert it to a template after you build it for easy deployment in the future.
Using VMware to run Kali Linux couldn’t be easier, and allows you to focus on the good stuff that comes with Kali, not scratching your head while trying to figure out how to get it up and running.