
Как настроить IPSec в Windows

Существует множество приложений, которые будут реализовывать аутентификацию и шифрование сетевого трафика через отдельную стороннюю программу.
Тем не менее, операционная система Microsoft может также реализовать это через конфигурацию IPSEC. В этой статье мы рассмотрим, что такое IPSEC, и простой пример реализации.
Что такое IPSEC?
Internet Protocol Security или IPSEC — это протокол, используемый для аутентификации и шифрования IP-коммуникаций. Это достигается путем взаимной аутентификации между агентами, а также обмена криптографическими ключами в начале сеанса.
IPSEC также позволит добавлять ограничения IP и шифрование на уровне TCP / UDP к приложениям, которые иначе не могут его поддерживать. IPSEC использует IP-протокол 50 (ESP), IP-протокол 51 (AH) и UDP-порт 500.
Внедрение IPSEC
В этом примере мы настроим IPSEC для шифрования связи между двумя компьютерами Windows. Первый компьютер, сервер Windows 2012 будет выступать в качестве сервера VPN.
Второй компьютер, клиент Windows 10, будет действовать как клиент VPN. LT2P IPSEC VPN может обмениваться либо предварительным общим ключом, либо сертификатом. В этом примере мы будем обмениваться предварительным общим ключом.
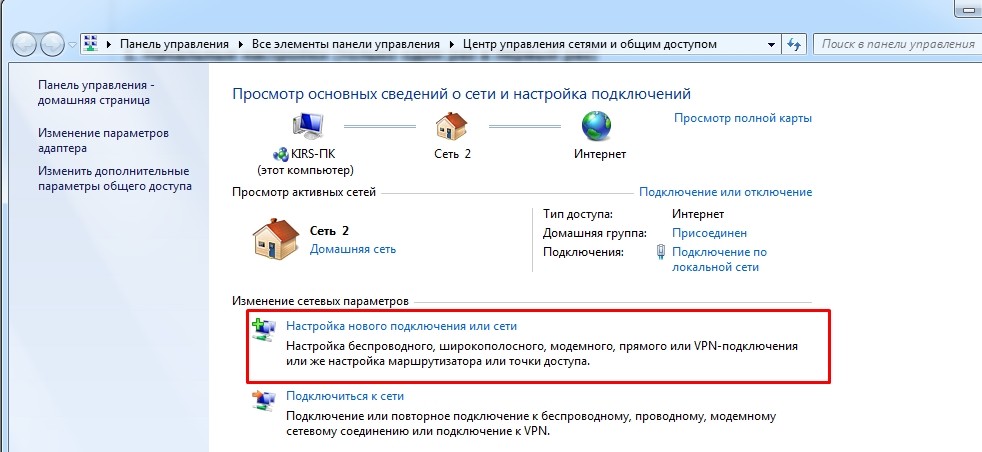
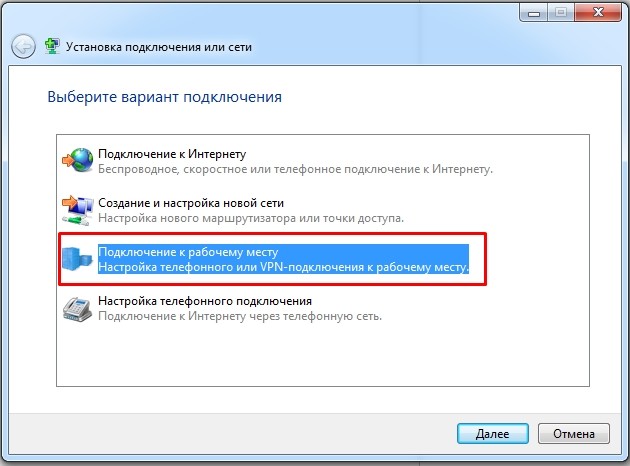
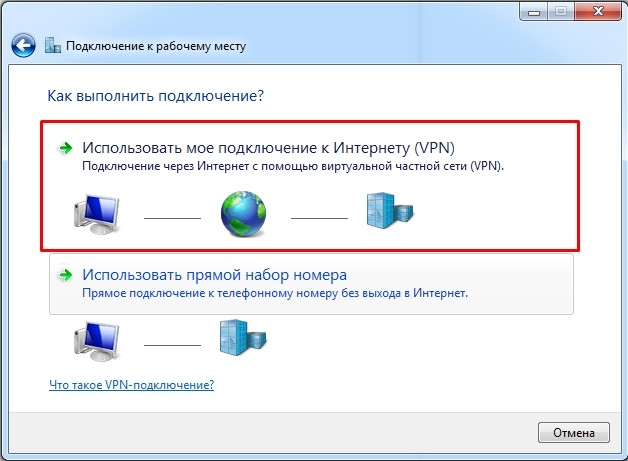
Настройка VPN-сервера
Сетевая политика и службы доступа
Сервер сетевой политики
Удаленный доступ
Прямой доступ и VPN (RAS)
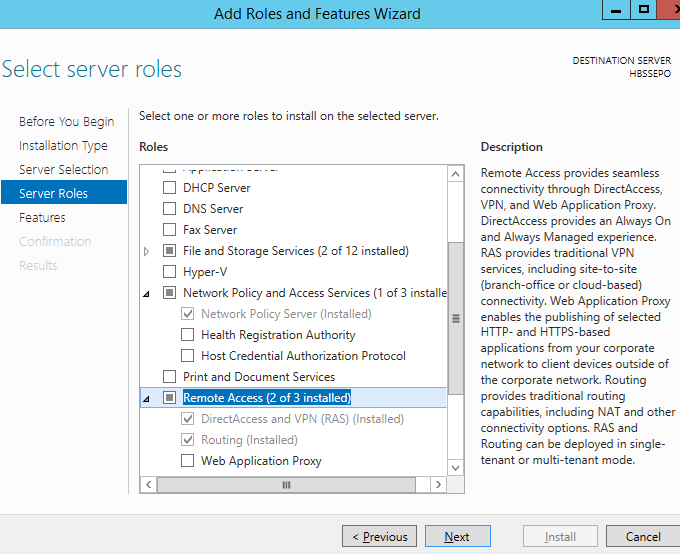
Эта оснастка позволяет настраивать многопротокольные службы маршрутизации LAN-to-LAN, LAN-to-WAN, виртуальная частная сеть (VPN) и трансляция сетевых адресов (NAT).
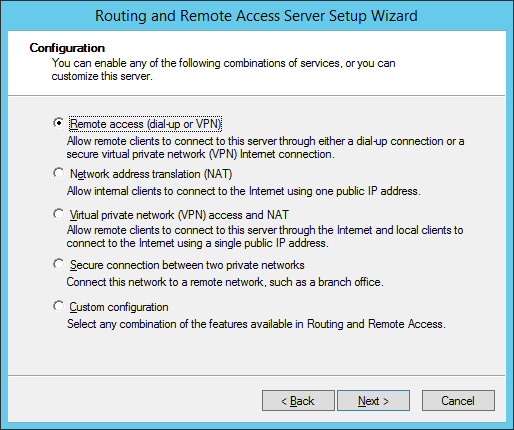
Далее попытайтесь запустить службу маршрутизации и удаленного доступа. Следующий ключ реестра может потребоваться удалить, чтобы запустить службу.
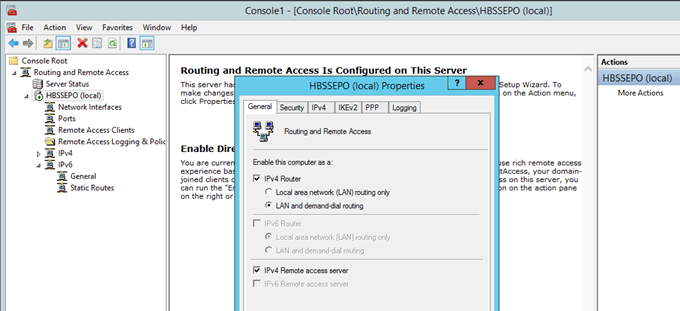
В консоли mmc.exe щелкните правой кнопкой мыши на имени компьютера и перейдите в Свойства. Измените эти свойства на вкладке безопасности.
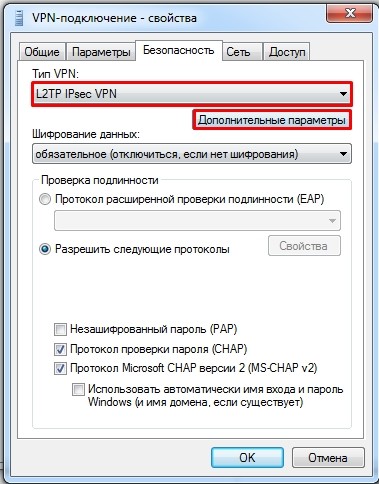
Выберите методы аутентификации, как показано ниже.
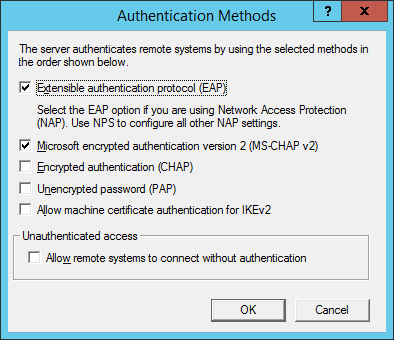
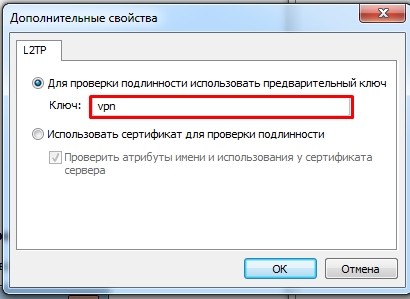
Установите флажок, чтобы разрешить настраиваемую политику IPSEC для соединения L2TP / IKEv2. Добавьте предварительный общий ключ.
Наконец, вам нужно будет изменить пользователя, чтобы получить доступ к VPN. Откройте compmgmt.msc, перейдите в раздел «Локальные пользователи и группы» и выберите свойства пользователя, которого вы хотите использовать для VPN.
Настройка машины с Windows 10
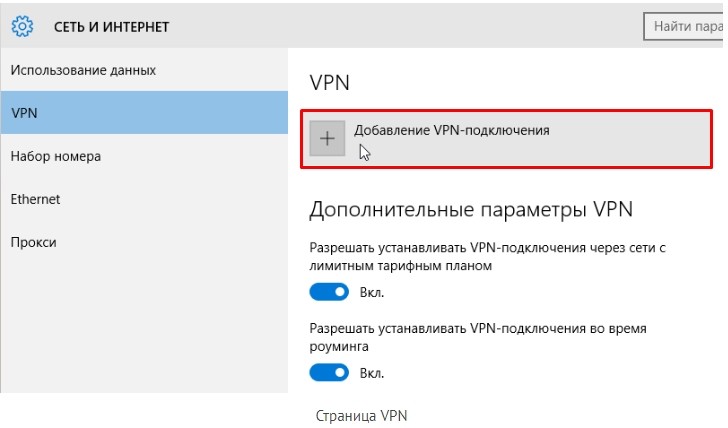
На компьютере с Windows 10 откройте «Настройки сети и Интернета». Выберите VPN на левой панели и добавьте VPN-соединение. Отредактируйте дополнительные параметры.
Разместите IP-адрес вашего VPN-сервера под именем или адресом сервера. Выберите L2TP/IPSEC с параметром предварительного общего ключа в разделе Тип VPN. Добавьте предварительно общий ключ и имя пользователя и пароль.
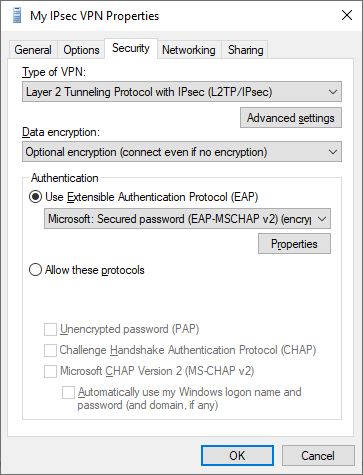
Свойства безопасности для VPN должны быть изменены под сетевым адаптером. На адаптере VPN выберите «Свойства» и перейдите на вкладку «Безопасность». Установите переключатель EAP и выберите Microsoft: защищенный пароль (EAP-MSCHAPv2) (шифрование включено).
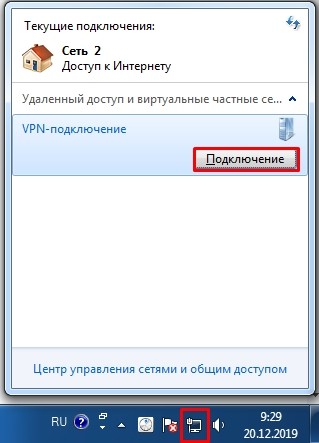
Наконец, снова щелкните правой кнопкой на адаптере для подключения. Поздравляем! Вы создали VPN-туннель IPSEC.
Клиент ipsec vpn для windows
Configure IPsec/L2TP VPN Clients
Read this in other languages: English, 简体中文.
Note: You may also connect using IKEv2 (recommended) or IPsec/XAuth mode.
After setting up your own VPN server, follow these steps to configure your devices. IPsec/L2TP is natively supported by Android, iOS, OS X, and Windows. There is no additional software to install. Setup should only take a few minutes. In case you are unable to connect, first check to make sure the VPN credentials were entered correctly.
Note: You may also connect using IKEv2 mode (recommended).
Note: This one-time registry change is required if the VPN server and/or client is behind NAT (e.g. home router).
If you get an error when trying to connect, see Troubleshooting.
Note: This one-time registry change is required if the VPN server and/or client is behind NAT (e.g. home router).
If you get an error when trying to connect, see Troubleshooting.
Alternatively, instead of following the steps above, you may create the VPN connection using these Windows PowerShell commands. Replace Your VPN Server IP and Your VPN IPsec PSK with your own values, enclosed in single quotes:
Windows 7, Vista and XP
Note: This one-time registry change is required if the VPN server and/or client is behind NAT (e.g. home router).
If you get an error when trying to connect, see Troubleshooting.
Note: You may also connect using IKEv2 (recommended) or IPsec/XAuth mode.
To connect to the VPN: Use the menu bar icon, or go to the Network section of System Preferences, select the VPN and choose Connect. You can verify that your traffic is being routed properly by looking up your IP address on Google. It should say «Your public IP address is Your VPN Server IP «.
If you get an error when trying to connect, see Troubleshooting.
Note: You may also connect using IKEv2 (recommended) or IPsec/XAuth mode. Android 12 only supports IKEv2 mode.
Once connected, you will see a VPN icon in the notification bar. You can verify that your traffic is being routed properly by looking up your IP address on Google. It should say «Your public IP address is Your VPN Server IP «.
If you get an error when trying to connect, see Troubleshooting.
Note: You may also connect using IKEv2 (recommended) or IPsec/XAuth mode.
Once connected, you will see a VPN icon in the status bar. You can verify that your traffic is being routed properly by looking up your IP address on Google. It should say «Your public IP address is Your VPN Server IP «.
If you get an error when trying to connect, see Troubleshooting.
Once connected, you will see a VPN icon overlay on the network status icon. You can verify that your traffic is being routed properly by looking up your IP address on Google. It should say «Your public IP address is Your VPN Server IP «.
If you get an error when trying to connect, see Troubleshooting.
Note: You may also connect using IKEv2 mode (recommended).
Once connected, you can verify that your traffic is being routed properly by looking up your IP address on Google. It should say «Your public IP address is Your VPN Server IP «.
If you get an error when trying to connect, try this fix.
Fedora 28 (and newer) and CentOS 8/7 users can connect using IPsec/XAuth mode.
First check here to see if the network-manager-l2tp and network-manager-l2tp-gnome packages are available for your Linux distribution. If yes, install them (select strongSwan) and follow the instructions above. Alternatively, you may configure Linux VPN clients using the command line.
Read this in other languages: English, 简体中文.
Error 809: The network connection between your computer and the VPN server could not be established because the remote server is not responding. This could be because one of the network devices (e.g, firewalls, NAT, routers, etc) between your computer and the remote server is not configured to allow VPN connections. Please contact your Administrator or your service provider to determine which device may be causing the problem.
Note: The registry change below is only required if you use IPsec/L2TP mode to connect to the VPN. It is NOT required for the IKEv2 and IPsec/XAuth modes.
Although uncommon, some Windows systems disable IPsec encryption, causing the connection to fail. To re-enable it, run the following command and reboot your PC.
Windows error 789 or 691
Error 789: The L2TP connection attempt failed because the security layer encountered a processing error during initial negotiations with the remote computer.
Error 691: The remote connection was denied because the user name and password combination you provided is not recognized, or the selected authentication protocol is not permitted on the remote access server.
For error 789, click here for troubleshooting information. For error 691, you may try removing and recreating the VPN connection, by following the instructions in this document. Make sure that the VPN credentials are entered correctly.
Windows error 628 or 766
Error 628: The connection was terminated by the remote computer before it could be completed.
Error 766: A certificate could not be found. Connections that use the L2TP protocol over IPSec require the installation of a machine certificate, also known as a computer certificate.
To fix these errors, please follow these steps:
For reference, see this screenshot of the VPN connection properties dialog.
Windows 10 connecting
If using Windows 10 and the VPN is stuck on «connecting» for more than a few minutes, try these steps:
Windows 10 upgrades
After upgrading Windows 10 version (e.g. from 1709 to 1803), you may need to re-apply the fix above for Windows Error 809 and reboot.
Windows DNS leaks and IPv6
Windows 8.x, 10 and 11 use «smart multi-homed name resolution» by default, which may cause «DNS leaks» when using the native IPsec VPN client if your DNS servers on the Internet adapter are from the local network segment. To fix, you may either disable smart multi-homed name resolution, or configure your Internet adapter to use DNS servers outside your local network (e.g. 8.8.8.8 and 8.8.4.4). When finished, clear the DNS cache and reboot your PC.
In addition, if your computer has IPv6 enabled, all IPv6 traffic (including DNS queries) will bypass the VPN. Learn how to disable IPv6 in Windows. If you need a VPN with IPv6 support, you could instead try OpenVPN.
Android MTU/MSS issues
Some Android devices have MTU/MSS issues, that they are able to connect to the VPN using IPsec/XAuth («Cisco IPsec») mode, but cannot open websites. If you encounter this problem, try running the following commands on the VPN server. If successful, you may add these commands to /etc/rc.local to persist after reboot.
Docker users: Instead of running the commands above, you may apply this fix by adding VPN_ANDROID_MTU_FIX=yes to your env file, then re-create the Docker container.
If your Android 6.x or 7.x device cannot connect, try these steps:
Docker users: You may set sha2-truncbug=yes (default is no ) in /etc/ipsec.conf by adding VPN_SHA2_TRUNCBUG=yes to your env file, then re-create the Docker container.
macOS send traffic over VPN
After trying the steps above, if your computer is still not sending traffic over the VPN, check the service order. From the main network preferences screen, select «set service order» in the cog drop down under the list of connections. Drag the VPN connection to the top.
iOS 13+ and macOS 10.15/11+
In addition, users running macOS Big Sur 11.0 should update to version 11.1 or newer, to fix some issues with VPN connections. To check your macOS version and update, refer to this article.
iOS/Android sleep mode
To save battery, iOS devices (iPhone/iPad) will automatically disconnect Wi-Fi shortly after the screen turns off (sleep mode). As a result, the IPsec VPN disconnects. This behavior is by design and cannot be configured.
If you need the VPN to auto-reconnect when the device wakes up, you may connect using IKEv2 mode (recommended) and enable the «VPN On Demand» feature. Alternatively, you may try OpenVPN instead, which has support for options such as «Reconnect on Wakeup» and «Seamless Tunnel».
Android devices will also disconnect Wi-Fi shortly after entering sleep mode, unless the option «Keep Wi-Fi on during sleep» is enabled. This option is no longer available in Android 8 (Oreo) and newer. Alternatively, you may try enabling the «Always-on VPN» option to stay connected. Learn more here.
Debian 11/10 kernel
To fix the issue with IPsec/L2TP mode, you may switch to the standard Linux kernel by installing e.g. the linux-image-amd64 package. Then update the default kernel in GRUB and reboot your server.
If you encounter other errors, refer to the links below:
Check logs and VPN status
Commands below must be run as root (or using sudo ).
First, restart services on the VPN server:
Then reboot your VPN client device, and retry the connection. If still unable to connect, try removing and recreating the VPN connection. Make sure that the VPN credentials are entered correctly.
Check the Libreswan (IPsec) and xl2tpd logs for errors:
Check the status of the IPsec VPN server:
Show currently established VPN connections:
Configure Linux VPN clients using the command line
After setting up your own VPN server, follow these steps to configure Linux VPN clients using the command line. Alternatively, you may connect using IKEv2 mode (recommended), or configure using the GUI. Instructions below are based on the work of Peter Sanford. Commands must be run as root on your VPN client.
To set up the VPN client, first install the following packages:
Create VPN variables (replace with actual values):
The VPN client setup is now complete. Follow the steps below to connect.
Note: You must repeat all steps below every time you try to connect to the VPN.
Create xl2tpd control file:
Start the IPsec connection:
Start the L2TP connection:
Check your existing default route:
Exclude your VPN server’s public IP from the new default route (replace with actual value):
If your VPN client is a remote server, you must also exclude your Local PC’s public IP from the new default route, to prevent your SSH session from being disconnected (replace with actual value):
Add a new default route to start routing traffic via the VPN server:
The VPN connection is now complete. Verify that your traffic is being routed properly:
To stop routing traffic via the VPN server:
This document was adapted from the Streisand project, maintained by Joshua Lund and contributors.
Note: This license applies to this document only.
Copyright (C) 2016-2021 Lin Song 
Based on the work of Joshua Lund (Copyright 2014-2016)
This program is free software: you can redistribute it and/or modify it under the terms of the GNU General Public License as published by the Free Software Foundation, either version 3 of the License, or (at your option) any later version.
This program is distributed in the hope that it will be useful, but WITHOUT ANY WARRANTY; without even the implied warranty of MERCHANTABILITY or FITNESS FOR A PARTICULAR PURPOSE. See the GNU General Public License for more details.
Лучшие бесплатные VPN программы для компьютера и ноутбука с Windows
Всем привет! Я потратил примерно неделю, чтобы найти для вас хорошие, работоспособные, бесплатные VPN для ПК. Все сервисы я протестировал на своем компе и ручаюсь, что они полностью работоспособны.
Почему я решил написать эту статью? Потому что большинство, что вы встретите в поисковике по данному запросу – это обычная реклама, и 99% VPN программ на компьютер, указанных на подобных сайтах, или платные, или имеют сильное ограничение по скорости, а то ещё хуже – ограничены по времени. Поэтому все эти «лучшие бесплатные ТОП-ы» – обычное разводилово.
Рассказывать про платные VPN для ноутбука или компа – особого смысла нет. Они примерно все одинаковые, как по цене, так и по качеству предоставляемых услуг. Поэтому не будем тянуть резину и начнем. Если у вас будут какие-то дополнения, вопросы, вылезет какая-то ошибка или будут проблемы, о которых я не написал – срочно пишем в комментарии, чтобы я вам помог. Также пишите про свои варианты бесплатных ВПН, и я после проверки добавлю их в статью.

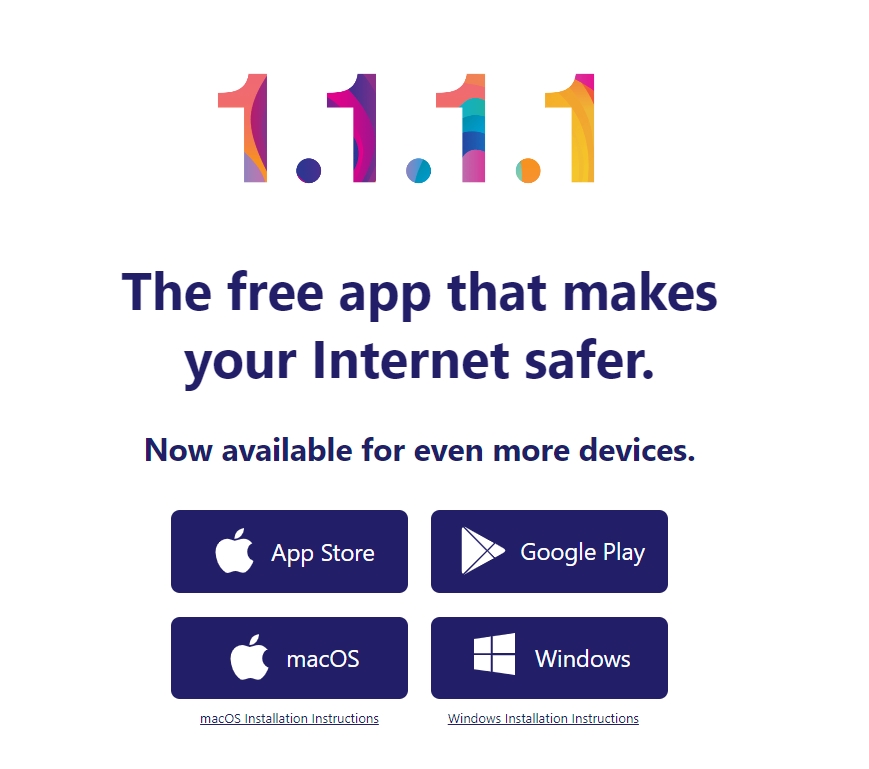
После установки достаточно открыть утилиту в трее и запустить WARP режим, который подключит ваш компьютер к выделенной и беслпатной VPN. Более подробно про это можно почитать тут.

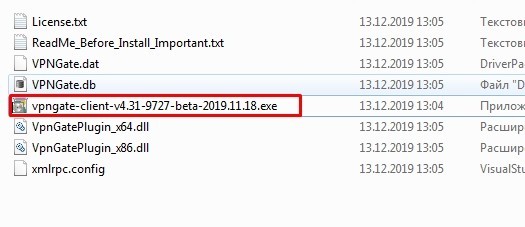
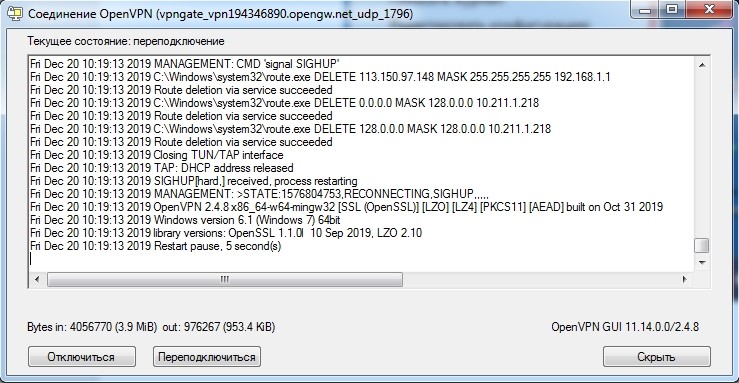
VPN Gate
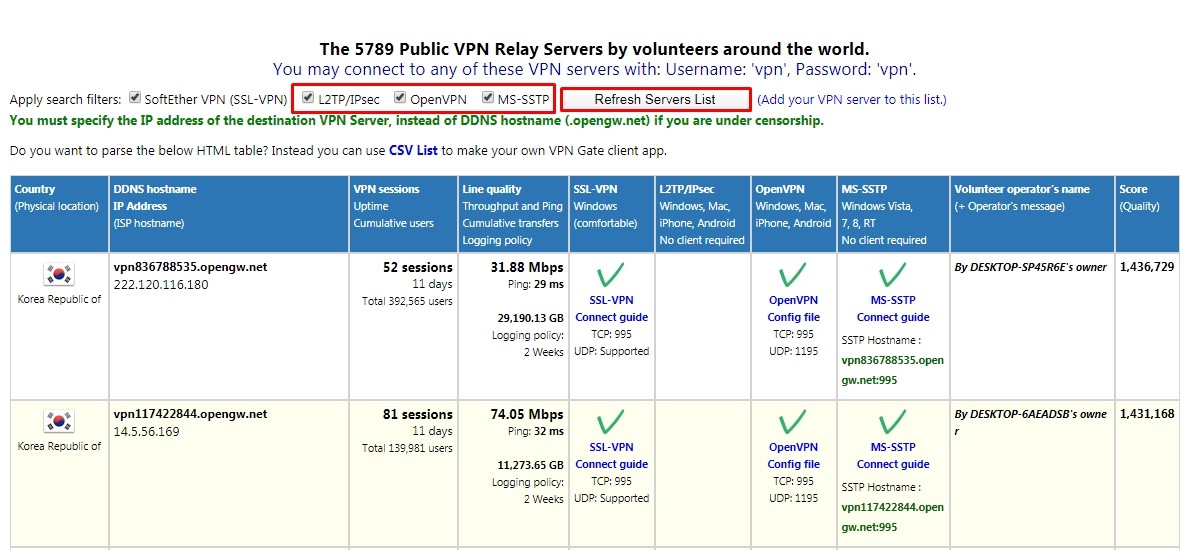
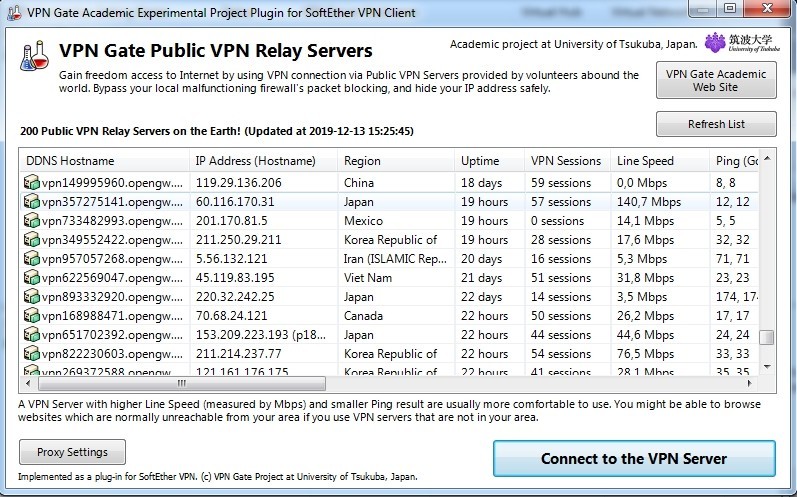
Полное название VPN Gate Academic Experiment Project — это онлайн-сервис, созданный в высшей школе университета Цукуба, в Японии. Проект полностью бесплатный и не требует регистрации. Работает достаточно просто – в интернете есть ряд добровольцев, которые выступают в качестве Free VPN серверов. Любой участник может подключиться к подобному серверу и использовать все прелести ВПН: обход блокировок, смена IP адреса, шифрование при передаче данных.
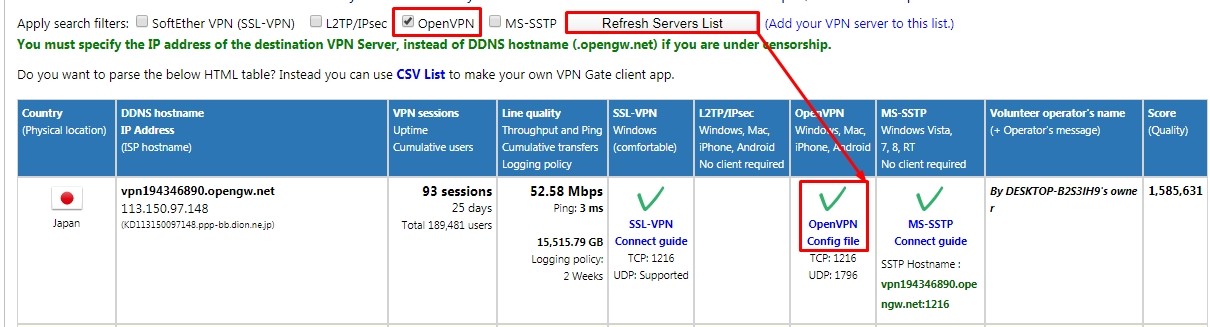
При этом вы можете работать практически со всеми платформами: Windows, Mac, iPhone, iPad и Android. Для шифрования используются протоколы: SSLVPN (SoftEther VPN), L2TP/IPsec, OpenVPN и Microsoft SSTP – обо всех них мы поговорим далее.
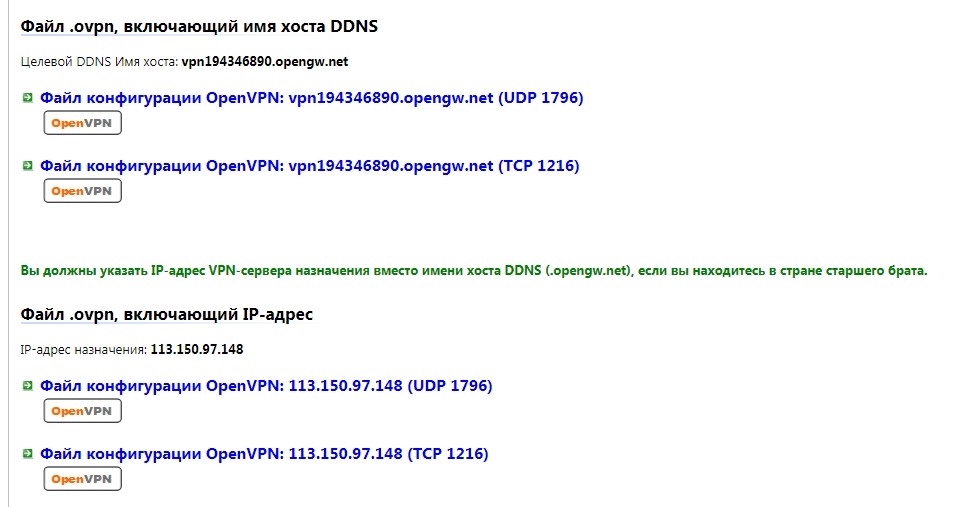
Правда есть несколько небольших минусов. Сервер может в любой момент отключиться, так как в качестве VPN для вашего компьютера выступает доброволец, и он просто может его выключить. Но на моей практике это бывает крайне редко. Тогда вы просто можете переподключиться к другому серверу – их сейчас более 5000. Второй минус – это динамический IP адреса серверов, именно поэтому мы будем использовать DDNS.
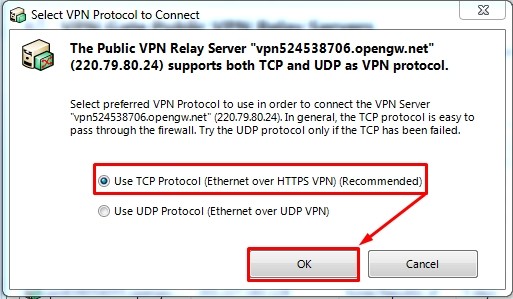
ВНИМАНИЕ! Для подключения протоколов: L2TP/IPsec, OpenVPN и Microsoft SSTP (без использования программы) – вам понадобится DDNS или IP адрес сервера. Эти данные постоянно обновляются на официальной странице (запомните эту ссылку, так как мы будем к ней постоянно обращаться). Во время настройки вам нужно будет в таблице выбрать определенный протокол (L2TP/IPsec, OpenVPN или Microsoft SSTP) и нажать «Refresh Servers List», чтобы увидеть конкретные сервера. На всякий случай я ещё раз напомню об этом во время настройки.
ПРИМЕЧАНИЕ! Если у вас MAC-бук, то по настройке вы можете посмотреть инструкцию тут.
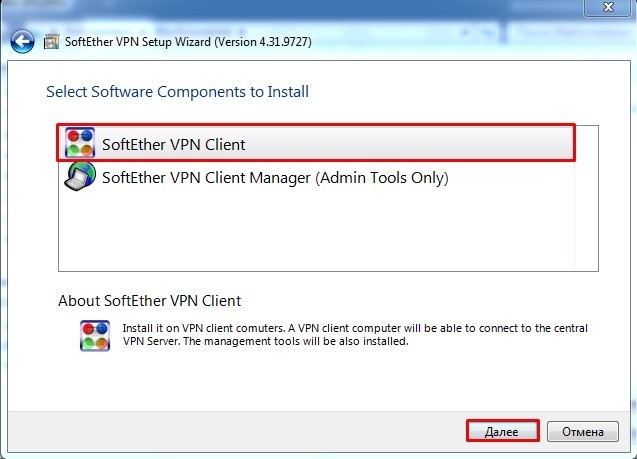
Приложение
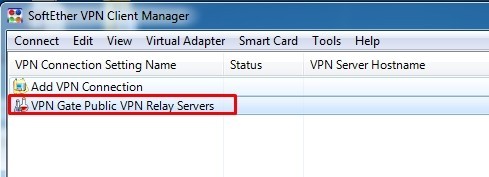
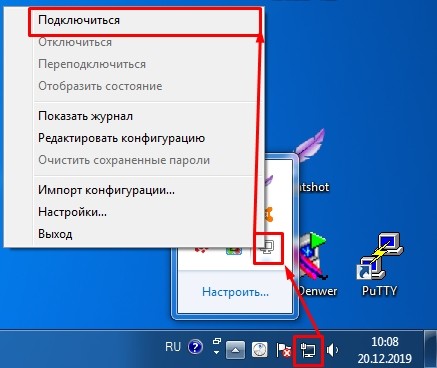
ПРИМЕЧАНИЕ! Если вылезет окно «Connect Error – VPN Gate Connection», то просто попробуйте переподключиться, нажав на кнопку «Retry». Если это не поможет – выберите другой сервер.
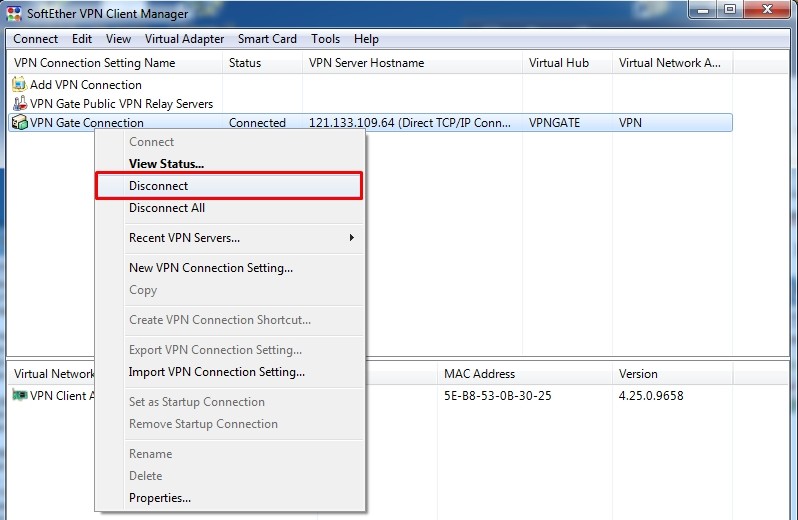
Если вы захотите отключиться, то просто нажмите правой кнопкой на подключение и выберите «Disconnect».
L2TP / IPsec VPN и MS-SSTP
Если вы не хотите устанавливать программу, то подключиться к серверам можно будет вручную. При этом настройка делается только один раз. Не забудьте про ту ссылку с конфигурациями VPN серверов, которую я указал ранее – она нам понадобится.
Windows 7
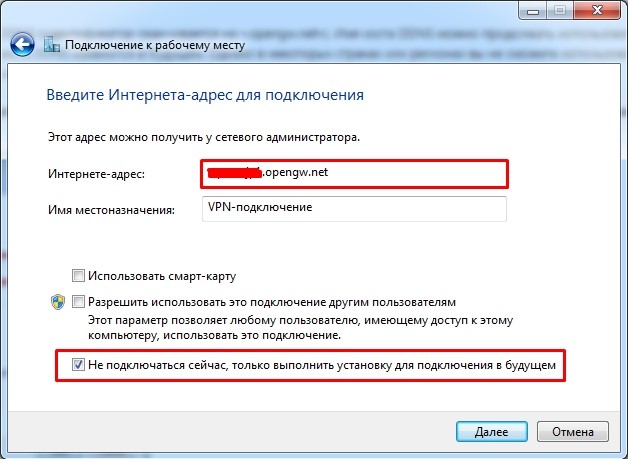
L2TP/IPsec: Вписываем DDNS в первую строку. Если в будущем будут какие-то проблемы с подключением, то можно попробовать IP. Убедитесь, чтобы стояла нижняя галочка «Не подключаться сейчас, только выполнить установку для подключения в будущем».
MS-SSTP: Здесь можно использовать только DDNS. Также если у вас будут проблемы с подключением и вылезет ошибка, то скорее всего сервер использует выделенный порт. В таком случае вам после DDNS адреса нужно дописать порт напрямую – смотрим в столбец «MS-SSTP» (если порт не указан или ошибка остаётся, используем «:443»). В конце нужно убрать галочку, которая выделена на картинке ниже.
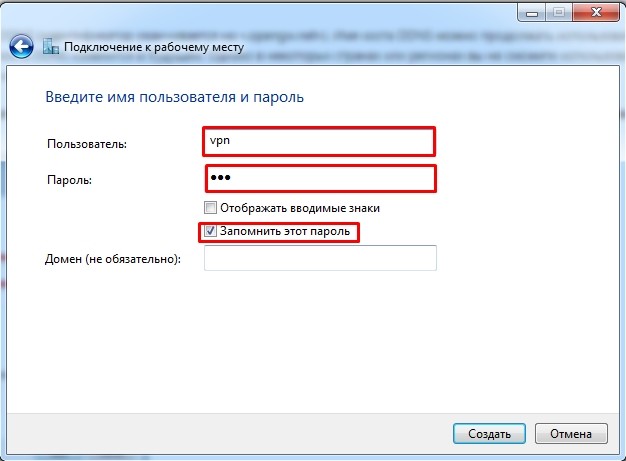
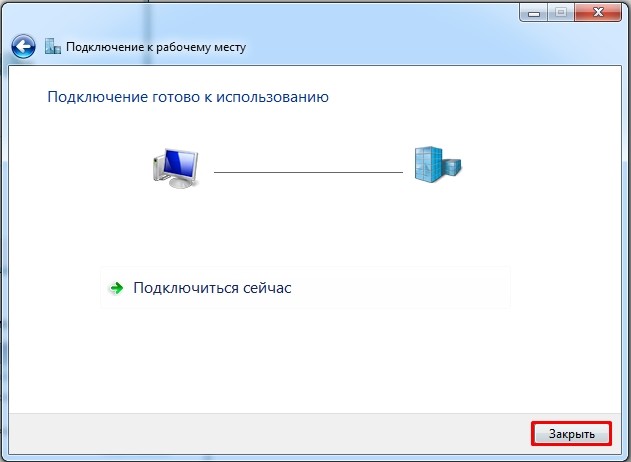
L2TP/IPsec: Самое главное сейчас не подключаться, так как мы ещё выполнили не все настройки. Нажмите «Закрыть» и перейдите к следующему шагу.
MS-SSTP: Соединение будет установлено. Можете проверять IP. На этом всё!

Windows 10

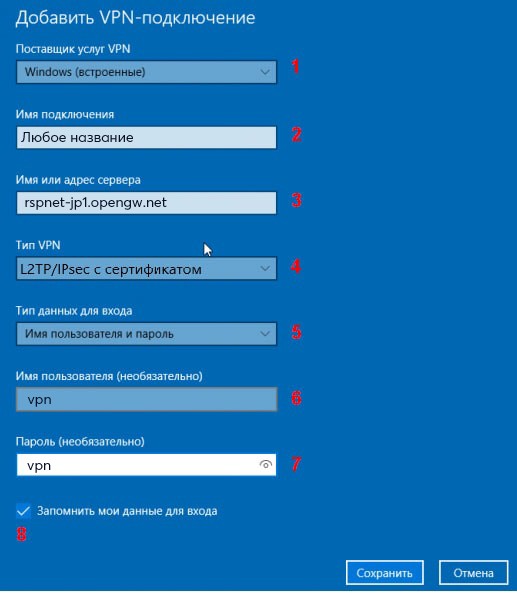
OpenVPN


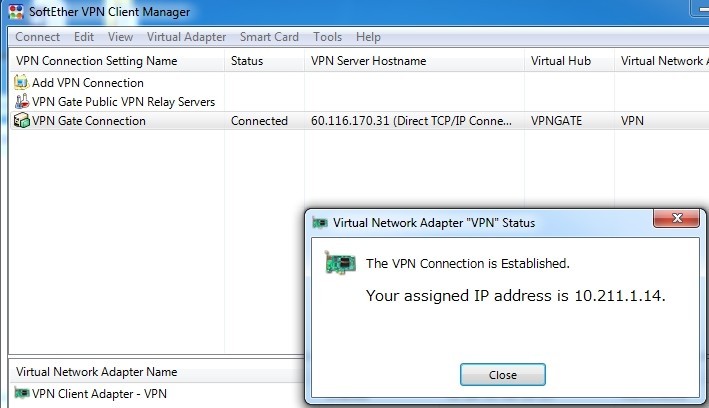
Далее вы увидите процесс подключения к серверу. Как только соединение будет установлено, окно свернется, а значок начнет подсвечиваться зеленым. В некоторых случаях понадобится ввести логин и пароль – в обе строки вводим «vpn».
ВПН Браузеры
17.06.2021 г. Роскомнадзор ограничил сервисы VPN VyprVPN и Opera VPN. Возможно, на текущий момент они еще не доступны. Но есть интересная статья для ознакомления.
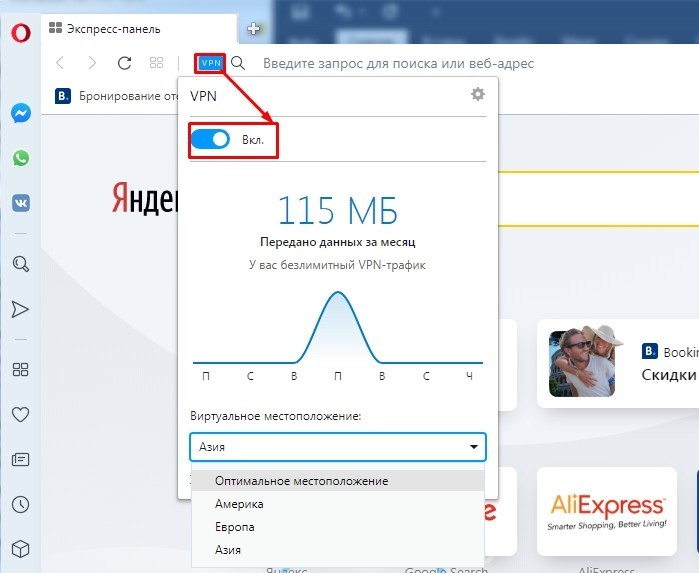
Если вам лень скачивать какие-то программы, и вам нужно всего лишь зайти на заблокированный сайт, то можно воспользоваться двумя вариантами. Первый – это скачать и установить браузер Opera на свой бук или ноут. После запуска программы вам останется просто нажать на кнопку «VPN» правее адресном строки, и перевести бегунок в режим «вкл».
Если вы используете Яндекс.Браузер, то вы можете посмотреть мою подборку расширений с возможностью бесплатного использования – по этой ссылке. Я очень скептически отношусь к подобным дополнениям, так как они слишком сильно режут скорость, но при этом дают слишком маленький выбор серверов.